


Centrify is now known as Delinea Account Lifecycle Manager and Okta’s Lifecycle Management are two well-known ULM platforms. Both offer similar functionalities but their approaches differ significantly.
So you as a CIO need to thoroughly evaluate both the tool’s key capabilities before opting for the suitable ULM tool.
To find the best one among Centrify account lifecycle manager (ALM) and Okta lifecycle management (LM), you, as a CIO, need to thoroughly look into each tool's capabilities and how they align with the specific requirements of your IT team.
Let's assume a company needs a user lifecycle management (ULM) tool suitable for both cloud-based and on-premises environments and with advanced access governance capabilities. So which tool do you think will be more apt for this scenario, Centrify ALM or Okta LM?
Now in this scenario, Okta LM can be a better choice as it is designed to manage user accounts and access privileges across a broader range of applications and services, including cloud-based and on-premises environments. Also, it provides advanced access governance capabilities, including automated access certification, segregation of duties (SoD) analysis, and risk-based access controls.
Whereas Centrify ALM manages Active Directory user accounts and access privileges, and its access governance capabilities are more limited, focused mainly on auditing and compliance reporting.
However, this was just an overview of how functions can bring a difference in the decision-making process. Though, you cannot decide which tool to choose based solely on one functionality. You need to carefully consider each of their distinctive features to select the best one.
So, let's move ahead and compare both tools based on different parameters to help you decide which ULM platform will best meet the requirements of your IT team.
Comparison Based On Different Parameters: Which ULM Tool Caters To Your IT Team’s Needs
Below mentioned factors will help you determine which tool offers better functionalities and helps your IT team streamline the user lifecycle management process.
1. Solution Categories
- Centrify is categorized as privileged access management (PAM) and secrets management tool.
- On the other hand, Okta is categorized as user provisioning, governance tools, and zero trust networking.
2. User Lifecycle Management
- Centrify ALM provides your team with the ability to manage the user lifecycle efficiently. This includes automatic account provisioning and deprovisioning process, single sign-on access to cloud apps, and self-service mobile management and security.
Further, it gives flexibility to your team to store identity where they want, such they can store it in on-premises Active Directory, in the cloud, or in the hybrid combination of both.
How Does Centrify ALM Work?
Centrify ALM enables your IT teams to create user accounts across cloud apps for new joiners automatically. This provisioning feature eliminates helpdesk calls by allowing your team to grant access to all the required apps to new employees for the first time and single sign-on to those applications without requiring multiple passwords.
Because new employees can easily access all of their apps with a single password and use any device they choose to access those apps, they experience "Day One" productivity.
Additionally, Centrify can automatically deliver role-based application access controls using user identity, enabling your team to assign the appropriate permissions and licensing to applications.
It also allows your IT team to disable access to all programs across all platforms from a single directory, preventing unauthorized access upon an employee's departure. - On the other hand, Okta LM assists your IT admin in automating manual onboarding and offboarding procedures.
How Does Okta LM Work?
Your team can grant access according to role, designation, or department, and they can withdraw all access upon departure. As a result, your employees will have a better overall working experience because they won't have to wait for long to start working after being hired.
Additionally, it quickly suspends user accounts and revokes access, allowing your team to recover software licenses and reduce costs. It also protects the SaaS app data from security lapses or hacking via an active account.
Further, it integrates with your HR system to streamline provisioning and deprovisioning processes. Additionally, your team can easily customize the workflow using Okta workflows without the need for coding.
Your team can easily grant access to the right applications to the right people and revoke access based on triggers from HR systems, IT resources like AD and LDAP, and more using Okta's automation and integration.
Also, it performs audits and produces reports displaying which workers have access to a specific application and which have recently had their privileges revoked. This lets your IT team view all users and their account access in one place.
3. Automation & Integration Capabilities
Automation Capabilities
- Centrify offers robotic process automation (RPA) that helps your IT team replace repetitive and mundane manual IT tasks through automation. Its RPA creates a non-person account, a bot mimicking your team's activities.
The bot uses particular keystrokes to open programs and operating processes, engage in two-way "conversations," share and document information, and access the user's computer in the same way that your team would.
In order to interact with them, robots require privileged access to other computers, apps, files, websites, databases, etc. Further, privileged access management (PAM) best practices prevent the need to hard code login information into scripts and provide security teams with visibility into the accounts that robots are using and the privileged operations they carry out; this helps simplify your IT operations. - Whereas, Okta automates workflows by replacing custom code with flexible if-this-then-that logic. Also, it provides your team with pre-built connectors, allowing them to connect to any API to handle complex identity automation.
Your team can even customize employee lifecycles, managing complex group memberships during onboarding. Further, it conducts regular audits and generates reports allowing your team to identify inactive users and immediately act on their accounts.
It doesn't stop here; it automatically detects suspicious or unauthorized activities, locks employees' devices, and deactivates accounts upon offboarding to prevent potential security breaches.
Integration Capabilities
- Centrify integrates with limited business systems and applications such as Box, Netsuite, Netskope, Concur, Dropbox, Google Apps for Work, and Amazon Web Services.
- Meanwhile, Okta has APIs allowing your team to customize various solutions fully. It has over 5500 integrations with third-party apps such as Office 365, Amazon Web Services, Slack, Workday, Zendesk, G Suite, Salesforce, ServiceNow, Splunk, and more.
4. Pricing Structure & Rating
- Centrify has different prices for different services; it starts at $4 per user per month for application services, including SSO, workflow & lifecycle management, app gateway, mobility management, and adaptive MFA for app access.
You have to pay $4 per user/month for endpoint services, including adaptive MFA & strong authentication, endpoint privilege management, conditional access, and device security management.
Furthermore, for infrastructure services, you need to pay $12 per user/month, which includes identity broker, privilege elevation, privilege access request, session recording & monitoring, adaptive MFA for privileged access, shared password management, secure remote access, and auditing & reporting.
Lastly, you have to pay $3 per user per month for analytics services, including behavior-based access control, insights, and explorer. - On the other hand, Okta's pricing starts from $2 per user per month for SSO. For a universal directory, you have to pay $1 per user/month, including basic user store, reporting, support for third-party second-factor authentication, and IP range & per-app policies.
Further, for lifecycle management, you need to pay $4 per user/month; however, it's a mandate to purchase a universal directory along with it. Lastly, for MFA, you have to pay $3 per user per month, including support for third-party second-factor authentication. - Customer Rating
Centrify- G2: 4.3
Okta- G2: 4.5, Cpaterra: 4.7
After going through the above parameters, you might have got an idea of which ULM tool will be more suitable. However, you can look into other efficient ULM tools, such as Zluri, that offer exquisite functionalities, helping your IT team streamline provisioning and deprovisioning processes. So what is Zluri? How does it work? Here's a quick brief.
Automate Lifecycle Management With Zluri’s Intelligent ULM platform
Zluri is an intelligent user lifecycle management platform that helps your IT team to automate provisioning and deprovisioning processes, simultaneously enhancing the employee experience. It ensures your team grants the right level of access to required SaaS apps to the right employee at the right time. According to KuppingerCole's research and analysis, Zluri's automated onboarding/offboarding speeds up the user lifecycle and reduces hours of manual effort for IT teams.
How does Zluri make it all possible? It allows your IT admin to create onboarding and offboarding workflow, which helps automate granting, modifying, and revoking access with just a few clicks. Further, it integrates with your organization’s HRMS platform so that your team gets all the updated details of the employees at the required time.
To provide you with a clearer understanding, let's take a closer look at how Zluri works throughout the various phases of an employee's lifecycle. By examining how it operates during each of these crucial stages, you'll gain a deeper appreciation for the power and versatility of this innovative platform.
Streamlining Provisioning Through Automation
With Zluri's ULM, your team can grant access to required SaaS applications with just a few clicks so that your employees can start with their work efficiently from day one without any interruption.
How does it work? Your team can create an onboarding workflow that will automate the provisioning process. So, here are the steps that your team needs to follow to create the workflow:
- Step 1: From Zluri's main interface, click on the workflow module and select the onboarding option from the drop-down list. Proceed by clicking on New Workflow.
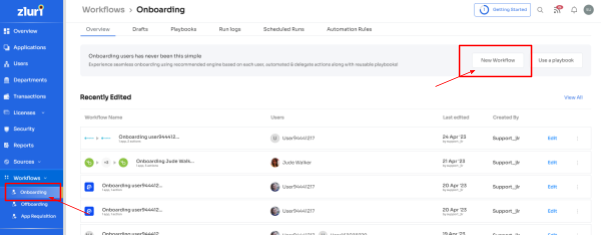
- Step 2: Select the user for the onboarding box will appear; from there, select the employee(s) whom you want to onboard. Also, you can search for a particular employee in the search bar. Once done selecting the employee, click on continue.
- Note: you can even select multiple employees; this helps onboard multiple new employees in one go
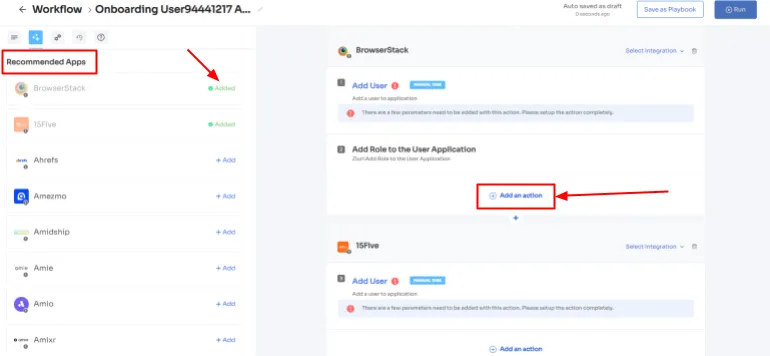
- Step 3: With its intelligent feature, Zluri would suggest some apps under recommended apps based on the employee's department, role, and seniority. Choose any of those, then execute the required action for the selected applications.
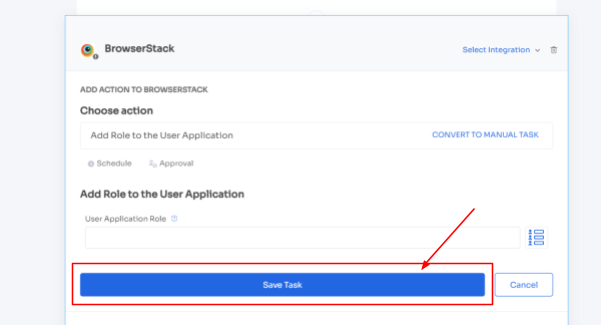
- Step 4: To execute certain actions, you need to Click on Edit Task and enter the required details. Your team can schedule the actions to execute the workflow on the day of onboarding. In order to save the actions, click on Save Task, and the actions will automatically be saved.
- Also, your team can add your employees to channels or send an automated welcome greeting using Zluri's in-app suggestions. The actions can vary for different applications and are mentioned under recommended actions.
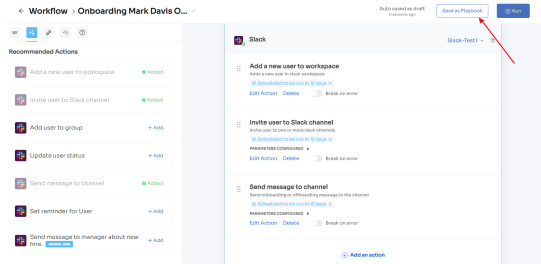
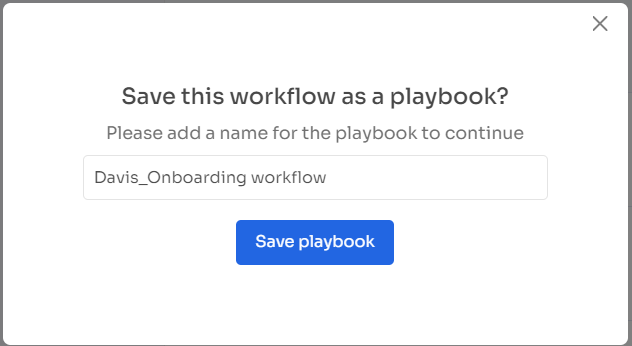
- Step 5: Finally, click on Save as Playbook to save the workflow. Then, you'll get a dialogue box with instructions to name the playbook. Add a name, proceed further by clicking on Save Playbook, and the onboarding workflow is ready.
Adapting to Change: Modifying Employee App Access to Accommodate Mid-Lifecycle Transitions
Employees need access to new SaaS applications to begin working when they are promoted, switch departments, or move to a different location. However, your IT admins need to ensure that the employee(s) only receive the access permission required for the new role and revoke their prior app access.
But how will your IT teams be aware of the change in employee roles? Zluri integrates with your organization’s HR system so that whenever an employee's role changes, Zluri retrieves the updated data from the HR system and updates it on the centralized dashboard. Now that it's easier for your IT admin to verify the employee's details from the dashboard, and can grant and remove employee access as necessary.
This is how your IT team benefits, but Zluri doesn't stop here; it enhances employee experience by offering a self-serve model, an Employee app store, i.e., a collection of SaaS applications approved and verified by the IT admin. This gives your employees the flexibility to choose any app from the EAS and gain access to it within no time.
All your employees need to do is submit an app access request. The IT admin will get notified immediately, quickly verify the employee's identity, and grant them secure access without disrupting the employee flow of work.
Now the ultimate question is how your employee can raise a request in EAS. Given below are the steps to submitting an access request:
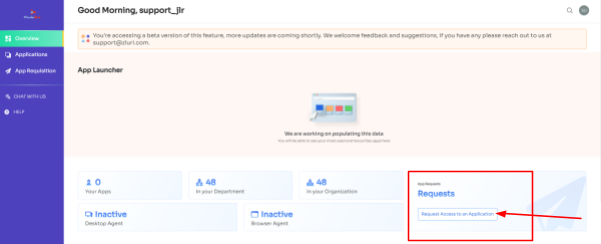
- Step 1: Your employees will receive an icon on the Zluri main interface's upper right corner; click on that, and a drop-down menu will appear; from there, click Switch to Employee View.

- Step 2: Overview dashboard will appear by default; now click on 'Request Access to an Application
- Step 3: Your employees will see a dialogue box where they need to enter the application name they require access to. Then, click on Continue.
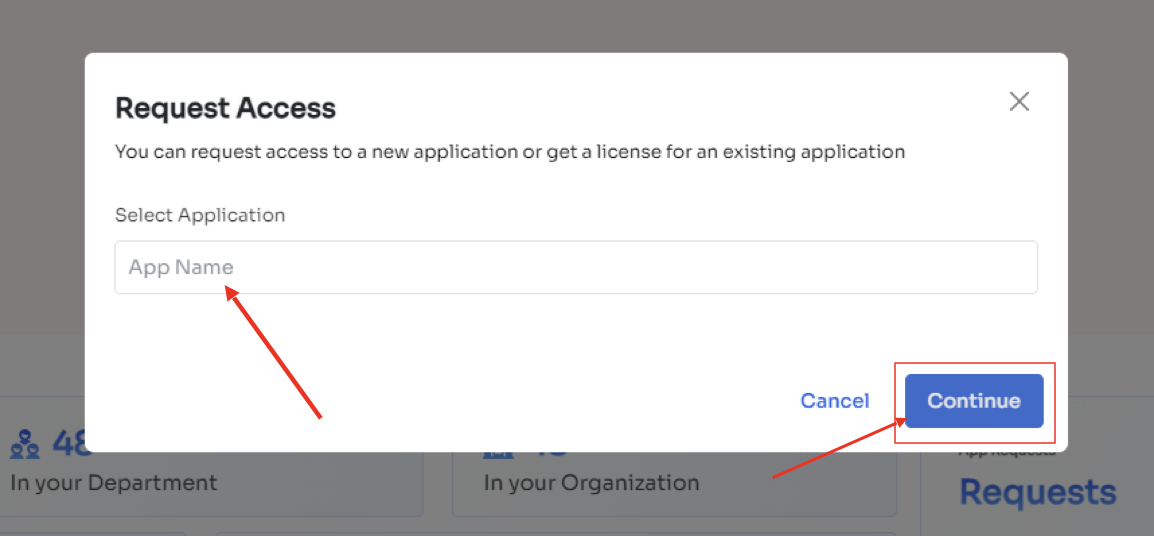
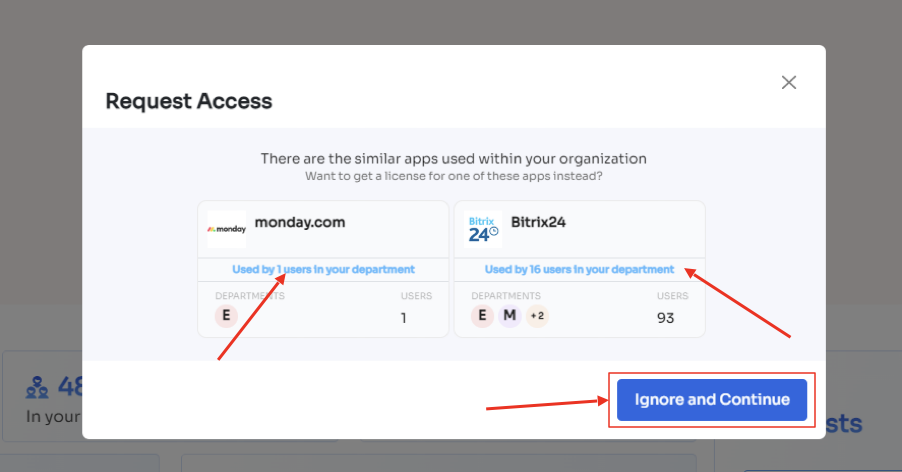
- Step 4: Some applications will not be used in the organization. However, your employees can still request that application. Click on continue, and another dialogue box will appear, showing similar applications that are being used in the organ
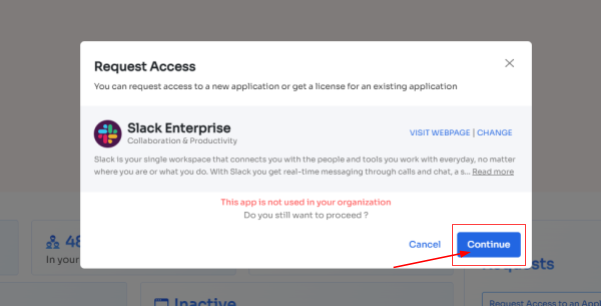
- ization.
- If your employees want to opt for a similar application, they can simply click on the application or click on Ignore and Continue to proceed forward with your request.
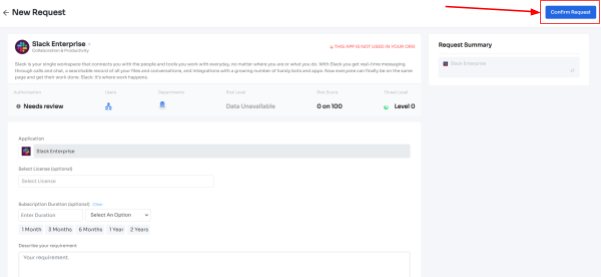
- Step 5: Further, they have to fill in the required details like selecting the license plan, subscription duration, and description of why they need the application and attach supporting documents. Once filled, click on Confirm request.
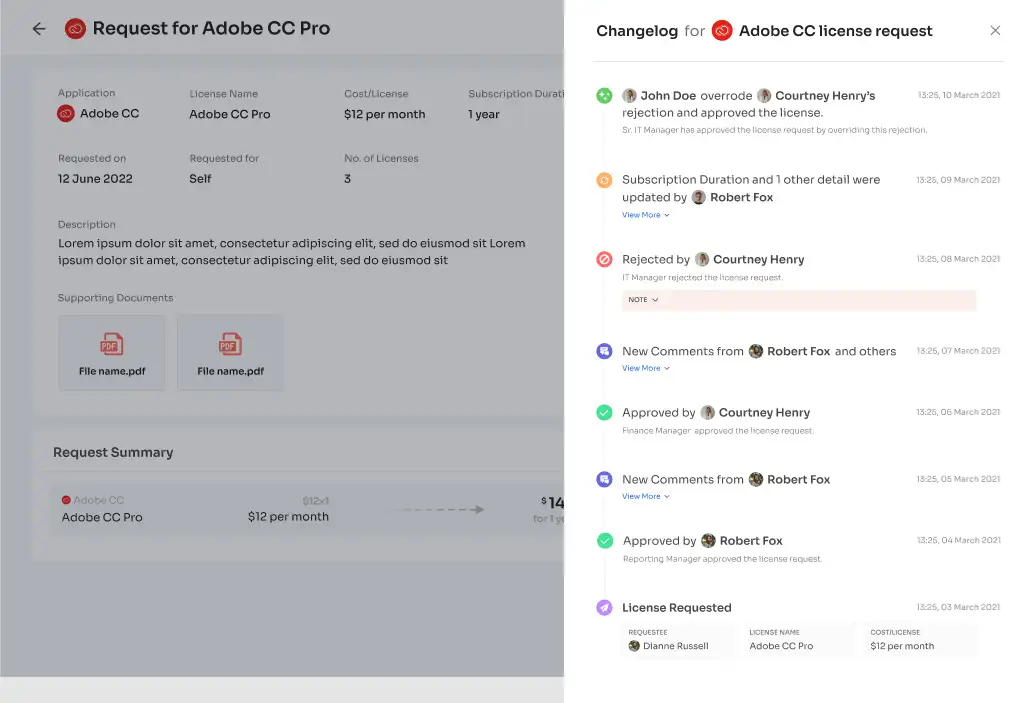
- Note: Additionally, if the request has been modified in any way or if one of the approvers suggests any substitutes for the application, your employee can check it in the \"Changelogs.\"
- And that's it. The app access request has been submitted.
Deprovisioning Employees with Just a Few Clicks
Employees depart from the organization due to termination, resignation, or retirement. However, revoking all access on time is crucial to prevent any security breaches. So what Zluri does is it enables your IT admin to automate the deprovisioning process by creating an offboarding workflow to ensure that they securely revoke all access from the employees, safeguarding SaaS app data against cyberattacks.
So here are the steps that your team needs to follow to create an offboarding workflow:
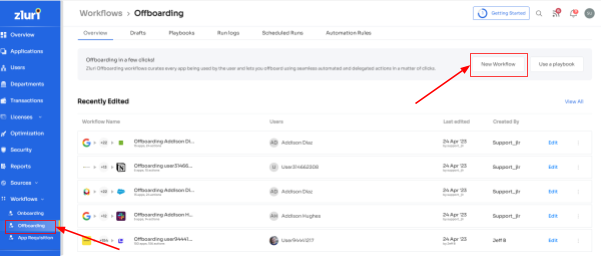
- Step 1: From Zluri's main interface, click on the workflow module and select the offboarding option from the drop-down list. Proceed by clicking on New Workflow.
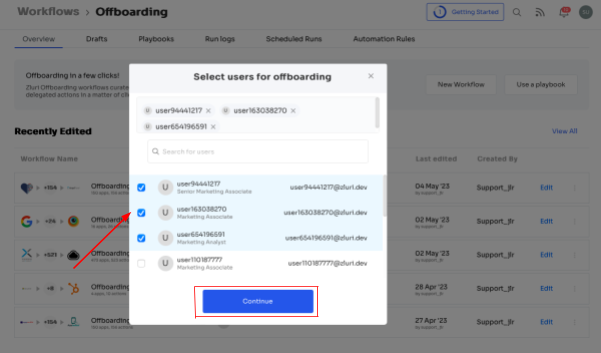
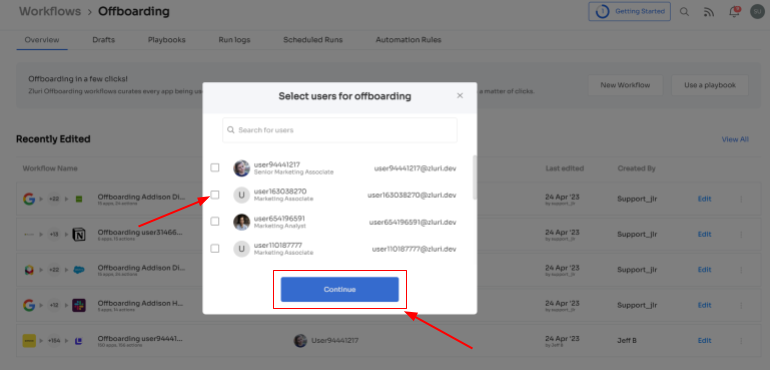
- Step 2: A popup labeled 'Select the user for offboarding' will appear. Select the employee(s) you want to offboard, or you can look for them in the 'search box. Click on continue after selecting the employee.
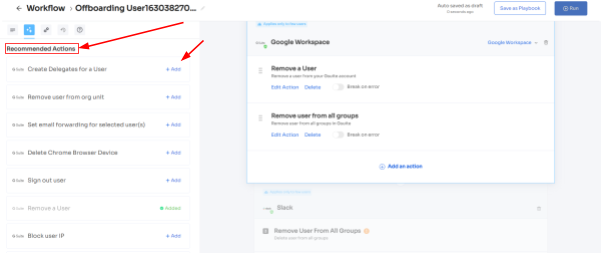
- Step 3: Your team will be able to view all the applications your employee can access. Now when you click on the app, Zluri will display some suggested actions under recommended actions. Select any of those or multiple actions, and then execute the required action for your chosen applications.
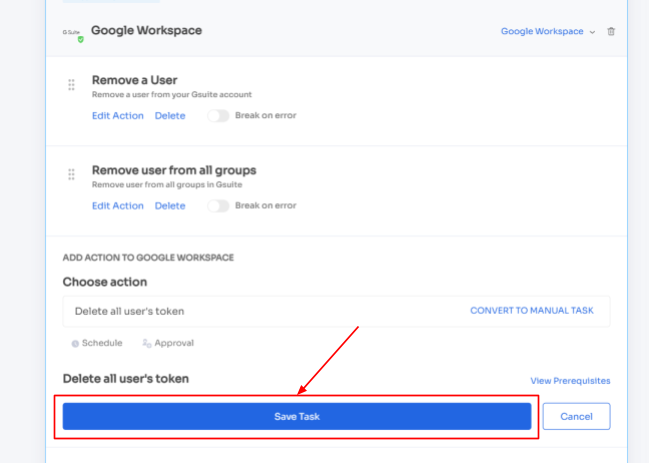
- Step 4: To add other actions, click Add an Action, fill in the required details, and proceed by clicking on Save Task; the actions will be saved.
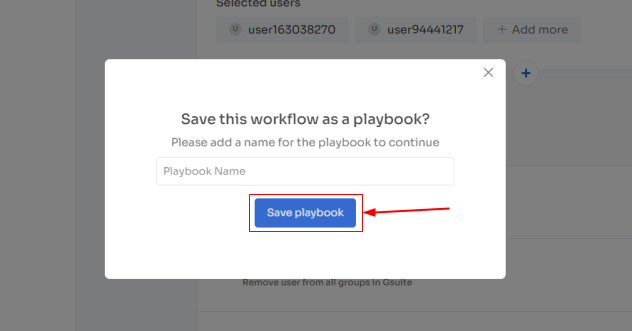
- Step 5: Save the workflow by clicking Save as Playbook. A dialogue box will appear, instructing to name the playbook.
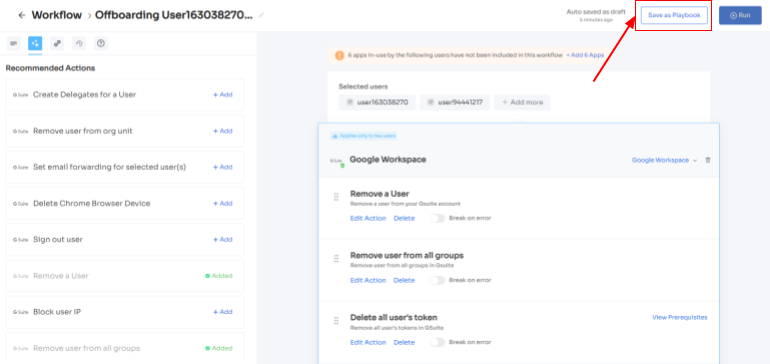
- Add a name, click Save Playbook, and the offboarding workflow is ready.
- So now you know why Zluri is the best of all; to learn more about it, book a demo now and give it a try.


.svg)


.svg)
.svg)
.svg)
.svg)

.svg)

.svg)

.svg)


.webp)


.webp)
.webp)


.webp)