Most companies claiming "automated provisioning" have 5 manual touch points and 10% app coverage. Here's what the other 90% looks like.
Your new software engineer starts Monday morning. How long until they're actually productive?
Traditional provisioning: 3 days
- Day 1: You create accounts
- Day 2: You configure access
- Day 3: Employee can finally work
Zero-touch provisioning: 15 minutes
- HR enters employee data
- System automatically provisions everything
- Employee productive Day 1, Hour 1
That's a 99.6% reduction in time-to-productivity.
Monday, 9:00 AM: Your new engineer Josh arrives for his first day.
Monday, 9:15 AM: Josh messages you on Slack: "I can't access GitHub."
Monday, 9:20 AM: You investigate. HR never told you Josh was starting today.
Monday, 9:30 AM: You start provisioning Josh's access.
Monday, 12:30 PM: Josh finally has access to most apps. Still waiting on AWS and a few others.
Josh's first impression: "This company doesn't have its act together."
Your weekend: You spent Saturday afternoon manually provisioning 5 new hires who start Monday because you only found out Friday afternoon.
This is why you need zero-touch provisioning.
This article explains what zero-touch provisioning actually means, why it's now a strategic priority (not just efficiency), and why most companies claiming "automated provisioning" aren't anywhere close to zero-touch.
Zero-touch provisioning means: HR enters employee data in HRIS. System automatically provisions everything. Employee productive on Day 1, Hour 1. You're not involved at all.
This is the logical endpoint of HR-driven provisioning. HR-driven provisioning makes HRIS your source of truth for lifecycle events (Prerequisite #1). Zero-touch provisioning automates everything downstream from those events. See our HR-driven provisioning guide for Prerequisite #1.
What "Zero-Touch" Actually Means
Zero-touch provisioning (ZTP) means exactly one human action triggers complete provisioning: HR enters employee data. Everything else—account creation, access configuration, verification—happens automatically.
The One-Touch Test
Count human actions required for new hire provisioning:
Traditional provisioning:
1. HR emails you: "New hire starting Monday"
2. You create Okta account
3. You provision GitHub
4. You provision Slack
5. You provision Jira
6. You provision AWS
... (repeat for 35 apps)
7. You email new hire: "Your accounts are ready"
8. New hire discovers missing apps
9. You provision forgotten apps
10. Manager grants team-specific access
Human actions: 10+
Touch points: Multiple people (HR, you, manager, employee)
"Automated" provisioning (SCIM only):
1. HR adds to Workday
2. You provision non-SCIM apps manually
3. You configure access (SCIM only created accounts)
4. You verify access works
5. Manager grants team-specific permissions
Human actions: 5
Better, but not zero-touch
Zero-touch provisioning:
1. HR adds to Workday (only human action)
System automatically:
- Creates Okta account
- Provisions all 35 apps (SCIM + API)
- Configures access based on role/team
- Verifies access works
- Sends welcome email with access inventory
- Notifies manager and you
Human actions: 1
Touch points: HR only (everyone else just receives notifications)
The defining characteristic: One human action. Everything downstream is automated.
What Zero-Touch Is NOT
Not zero-touch:
1. "We use SCIM, so provisioning is automated"
Reality: SCIM creates accounts, you still configure access manually
2. "New hires get access on Day 1"
Reality: New hires get *some* access on Day 1, rest over next 2 days
3. "We have automated onboarding"
Reality: You spend 2 hours per new hire clicking through provisioning
Actual zero-touch:
HR enters data → System does everything → Employee productive
No IT involvement
No manual configuration
No follow-up tickets
Complete provisioning in minutes
Why "Touch" Count Matters
Every human touch point:
- Adds time (hours to days)
- Introduces error (15-20% error rate per touch)
- Requires coordination (scheduling, hand-offs)
- Creates bottleneck (waiting for person to act)
- Scales linearly (100 new hires = 100x effort for you)
Zero touches:
- Instant (minutes, not days)
- Consistent (automated, no variation)
- No coordination needed
- No bottleneck
- Scales infinitely (100 new hires = same 15 minutes each)
The goal: Reduce touches from 10+ to 1.
Why Zero-Touch Matters Now
Zero-touch provisioning isn't new conceptually. HRIS integrations and automation have existed for years. So why does it matter now?
Five forces making zero-touch a strategic priority:
1. You Can't Scale Provisioning Linearly Anymore
Traditional scaling (manual provisioning):
- 10 new hires/month: 30 hours your team's time (manageable)
- 50 new hires/month: 150 hours = 1 FTE dedicated to provisioning
- 100 new hires/month: 300 hours = 2 FTEs dedicated to provisioning
The math: At 100 hires/month, you need 2 full-time people just clicking through provisioning UIs. That's not scaling—that's hiring more people to do repetitive work.
Zero-touch scaling:
- 10 new hires/month: 0 hours
- 50 new hires/month: 0 hours
- 100 new hires/month: 0 hours
Infinite scaling: 10x the hires = same IT headcount
The breaking point: Most companies realize they need zero-touch around 50-100 employees and 10+ hires/month. After that, manual provisioning consumes more IT resources than strategic work.
If your company is growing, manual provisioning is a strategic liability, not just an efficiency issue.
2. Remote Work + Scale Means You Can't Coordinate Informally
Pre-2020 (and <200 employees):
- Employees in office
- You physically saw new hires
- Manager mentioned: "Josh joins Monday"
- You provisioned based on informal communication
Post-2020 (and >200 employees):
- Employees distributed across regions/countries
- You never meet 60% of employees
- Managers don't chat with you
- Only way you know someone exists: Systematic integration
At 200+ employees and distributed teams:
- You can't personally know every employee
- You can't rely on hallway conversations
- You need zero-touch integration or you're perpetually discovering new hires through Slack messages
Reality check: If your company has >200 employees or >20% remote, informal coordination doesn't work. You need zero-touch.
3. Tool Sprawl (+ Shadow IT + AI Tools) Makes Manual Provisioning Impossible
2016: Provision 5 apps (email, file share, VPN, intranet, CRM)
2026: Provision 35+ sanctioned apps (GitHub, Slack, Jira, AWS, Google Workspace, Zoom, Figma, Notion, Linear, Confluence, Datadog, PagerDuty, 1Password, Salesforce, HubSpot, Zendesk, Intercom, Amplitude, Mixpanel, Segment, Snowflake, Looker, Tableau, Miro, Lucidchart, Asana, Monday, ClickUp, Airtable, Retool...)
But that's just what you know about. Reality: You only have visibility into 30-40% of actual tools employees use.
Plus shadow IT (60-70% of actual apps): Teams adopt tools without your approval
- Design team starts using Canva
- Engineering starts using Cursor AI
- Sales starts using Apollo
- Marketing uses Notion AI
- You discover these 3 months later (or never)
Plus AI tools explosion:
- ChatGPT Enterprise
- Claude for Work
- GitHub Copilot
- Cursor
- v0
- Replit
- Each with their own provisioning requirements
- Most adopted without IT approval
Time per new hire:
- 2016: 30 minutes (5 apps × 6 min each)
- 2026: 3 hours (35+ known apps × 5 min each, plus troubleshooting)
- But you're only provisioning the 30-40% of apps you know about
The real problem: You can't provision what you don't know exists.
SCIM might automate 60% of the apps you know about. But you only know about 30-40% of actual apps. So SCIM covers ~24% of reality (60% × 40%).
You can't manually provision 35+ known apps per hire at scale. And you can't provision the 60-70% shadow IT apps you don't even know exist.
Zero-touch requires visibility into all apps FIRST, then automation. Otherwise you're automating 30% and leaving 70% unmanaged.
4. Employee Expectations Changed (Competing for Talent)
2016 new hire expectations:
- "I'll have email set up within 2 days"
- "I'll submit IT tickets for any apps I need"
2026 new hire expectations:
- "Everything works Day 1, Hour 1"
- "I'm productive immediately, like every other modern company"
Reality: Employees joining from Google, Stripe, Airbnb, or any modern tech company expect zero-friction onboarding. If your company takes 3 days to provision access, you signal operational immaturity.
First impression matters:
- Positive signal: "This company has its act together" (zero-touch)
- Negative signal: "Why doesn't my access work?" (3-day manual provisioning)
In a competitive talent market, Day 1 experience matters. Zero-touch is your competitive advantage.
5. Compliance Requirements Tightened (SOC 2 Type II)
Old audit standard: "Do you deprovision terminated employees?"
New audit standard: "Prove you deprovision within 24 hours. Show us the audit trail."
Traditional provisioning:
- Audit question: "When was employee X terminated and when was access revoked?"
- You: "Let me check emails... HR told us on Day 2... we deprovisioned on Day 4..."
- Auditor: "So former employee had access for 4 days?"
- Audit finding: Failed (access not revoked within 24 hours)
Zero-touch provisioning:
- Audit question: "When was employee X terminated and when was access revoked?"
- System: "Terminated in HRIS: 2024-03-15 17:00. Access revoked: 2024-03-15 17:12"
- Auditor: "12 minutes. Acceptable."
- Audit: Passed ✓
Complete audit trail from authoritative source (HRIS) to provisioning action to verification.
You can't pass SOC 2 Type II with manual provisioning and email coordination. Zero-touch gives you audit-ready compliance.
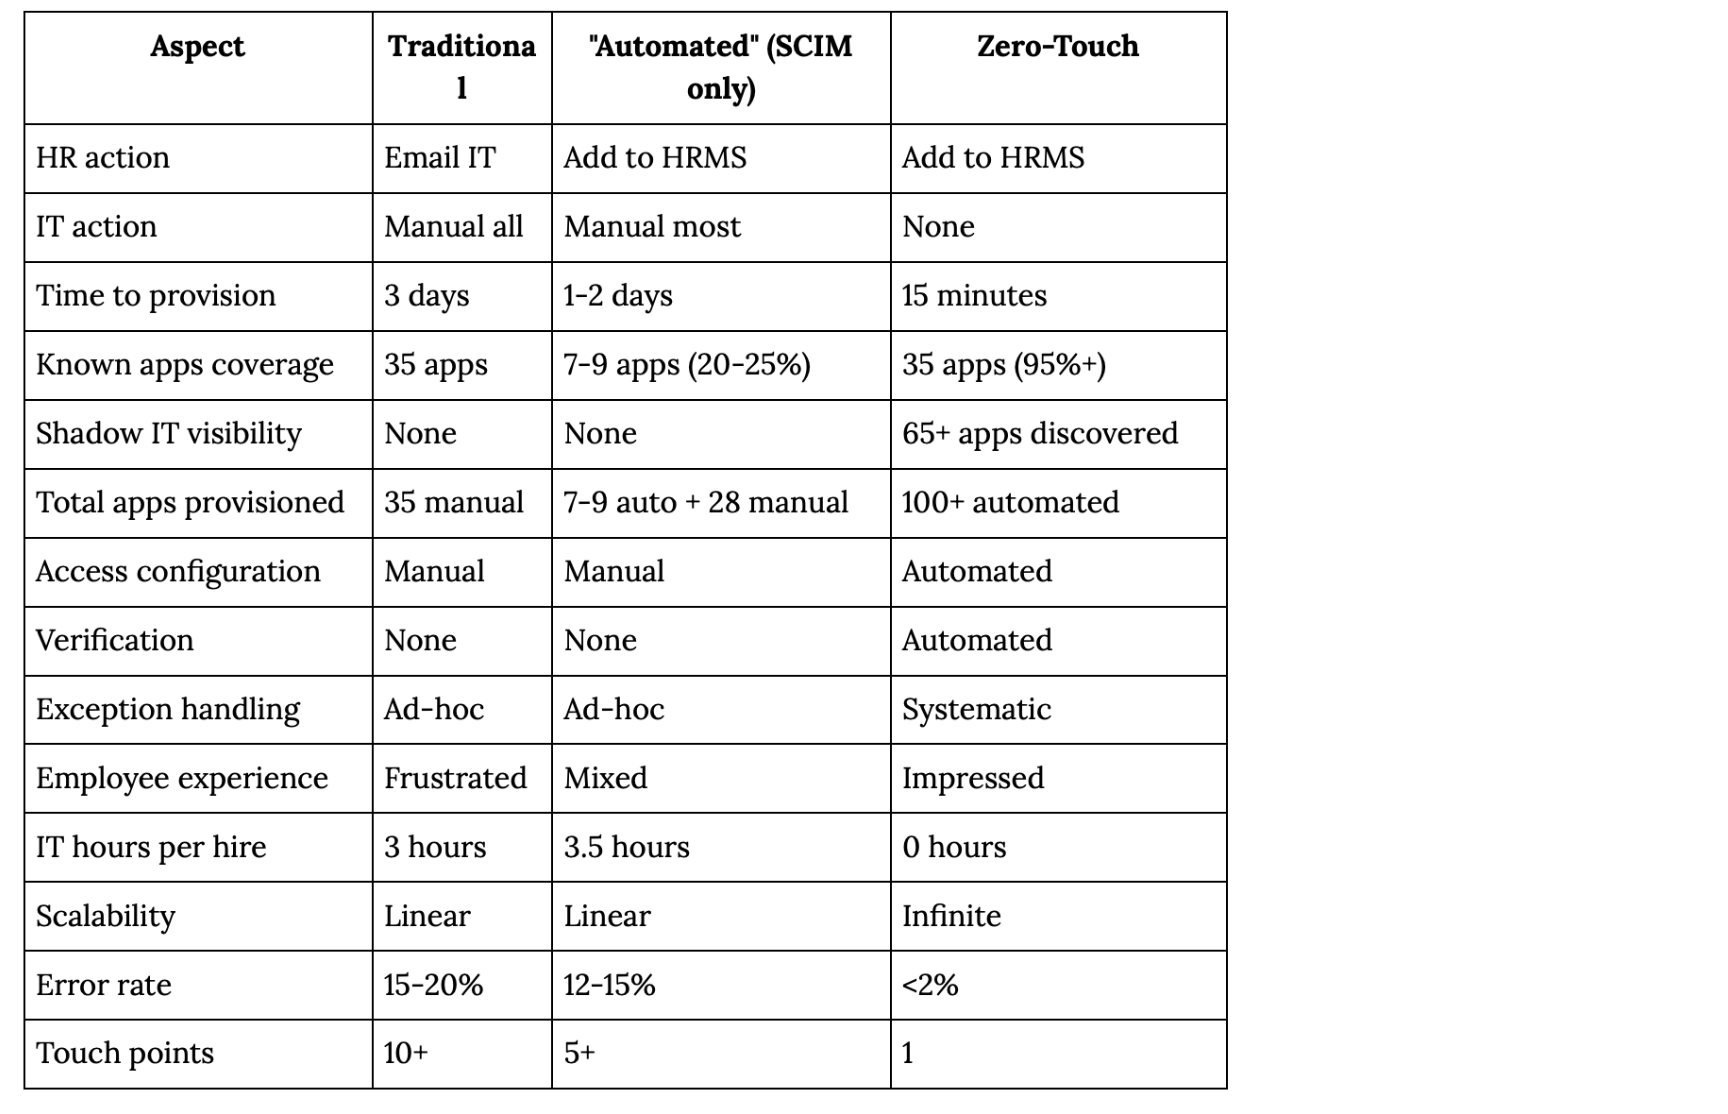
Zero-Touch vs. "Automated" Provisioning
Most companies claim automated provisioning. Few have zero-touch. Here's the difference:
Comparison Table
Real-World Examples
Company A: "We have automated provisioning" (SCIM only)
Setup:
- Okta → SCIM → 7-9 apps (20-25% of known apps)
- Remaining 26-28 apps: Manual provisioning
- Shadow IT: 65+ apps (no visibility, no provisioning)
New hire flow:
1. HR adds to Workday
2. SCIM provisions 7-9 apps automatically (accounts only)
3. You configure access manually for SCIM apps (1 hour)
4. You provision 26-28 non-SCIM apps manually (2+ hours)
5. New hire discovers shadow IT tools, asks teammates for access
Total time: 1-2 days
IT hours: 3+ hours
Touch points: 5+ (HR, you, teammates for shadow IT)
Assessment: <10% automated, not zero-touch
Company B: "We have automated provisioning" (SCIM + manual verification)
Setup:
- Okta → SCIM → 7-9 apps (20-25% of known apps)
- Manual provisioning for 26-28 apps
- You verify access manually
- Shadow IT: 65+ apps (no visibility)
New hire flow:
1. HR adds to Workday
2. SCIM provisions 7-9 apps (accounts only)
3. You configure access for SCIM apps manually (1 hour)
4. You provision 26-28 non-SCIM apps manually (2 hours)
5. You test access manually (30 min)
6. You email new hire: "Accounts ready"
Total time: 1-2 days
IT hours: 3.5+ hours
Touch points: 2+ (HR, you, plus teammates for shadow IT)
Assessment: <10% automated, not zero-touch
Company C: Zero-touch provisioning
Setup:
- Discovery tool: Identifies all 100+ apps (35 known + 65 shadow IT)
- Okta → SCIM → 7-9 apps (automated)
- Custom orchestrator → API → 90+ apps (automated via API)
- Policy engine determines access (automated)
- Verification tests (automated)
- Manual ticket for 2-3 apps without API (systematic exception)
New hire flow:
1. HR adds to Workday (only touch point)
2. System provisions all 100+ apps automatically (SCIM + API)
3. System configures access based on policies (including shadow IT)
4. System verifies access works
5. System emails new hire: "Welcome! Access ready"
6. System emails manager: "Josh provisioned successfully"
7. System creates tickets for 2-3 manual apps
Total time: 15 minutes
IT hours: 0 hours (except 2-3 manual app tickets)
Touch points: 1 (HR only)
Assessment: True zero-touch (95%+ automated including shadow IT)
The difference: Zero-touch requires all six prerequisites. Partial automation still has touch points.
Why "SCIM = Automated" Is Wrong
The three fatal flaws with SCIM-only provisioning:
Flaw 1: Low App Coverage Due to SSO Tax
Most SaaS vendors charge extra for SCIM support (the "SSO tax"). Result:
- Only ~20-25% of your known apps actually have SCIM
- Even if app has SSO, doesn't mean it has SCIM
- SCIM is expensive add-on that many companies skip
Example:
- GitHub: Has SCIM ✓
- Linear: Has SSO, no SCIM ✗
- Notion: Has SSO, no SCIM ✗
- Figma: Has SSO, SCIM costs extra ✗
Reality: SCIM covers 20-25% of apps you know about, not 60%.
Flaw 2: SCIM Isn't Granular (Creates Accounts, Not Access)
What SCIM actually does:
- Creates user accounts (username + password)
- Assigns to apps based on group membership
- Does NOT configure permissions (which repos, which projects, which channels, which role)
What this means:
Day 1, 9am: Josh logs in
Josh: "I can access GitHub, but I can't see any repos"
Josh: "I can access Jira, but I can't create issues"
Josh: "I can access Slack, but I'm not in any channels"
Josh: "I can access Salesforce, but I'm not in any role"
Josh messages you: "My access doesn't work"
SCIM created the account. You still need to manually configure:
- Which GitHub repos (and with what permissions: read/write/admin)
- Which Jira projects (and with what role: viewer/developer/admin)
- Which Slack channels (public/private/team-specific)
- Which Salesforce role (sales rep vs. manager vs. admin)
You still spend 2 hours per hire configuring granular permissions manually.
Flaw 3: SCIM Only Sees SSO-Connected Apps (30-40% of Reality)
What SCIM provisions:
- Apps connected to your IdP (Okta, Azure AD)
- Apps employees log into via SSO
- This is only 30-40% of actual apps employees use
What SCIM doesn't see (60-70% shadow IT):
Marketing using:
- Canva (not SSO-connected)
- Grammarly (personal accounts)
- Loom (team signed up directly)
Engineering using:
- Cursor AI (personal accounts)
- Replit (individual signups)
- Various open source tools
Sales using:
- Apollo (not connected to SSO)
- LinkedIn Sales Navigator (personal)
- Various prospecting tools
Design using:
- Figma (some teams SSO, some don't)
- Miro (half the company has personal accounts)
SCIM provisions the 30-40% of apps connected to SSO. It has zero visibility into the 60-70% of shadow IT apps.
The Math:
Apps you know about (SSO-connected): 35 apps
SCIM coverage of known apps: 20-25% (7-9 apps)
Actual apps employees use: ~100 apps (including shadow IT)
SCIM coverage of reality: 7-9 out of 100 = 7-9%
You're automating <10% and leaving 90%+ unmanaged.
SCIM + API + Access Reviews + Visibility = Better (But Still Not Zero-Touch)
If you have:
- SCIM (for apps that support it)
- API integrations (for apps without SCIM)
- Connection to access reviews and policies
- Visibility into shadow IT (discovery tools)
- Connection to provisioning workflows and automation
This is significantly better than:
- SSO alone (no automated provisioning)
- General workflow automation tools (Zapier, Workato - disconnected from access policies)
But it's still not zero-touch because:
- Manual granular permission configuration
- Manual discovery of shadow IT
- Manual policy enforcement
- Manual verification
Zero-touch requires: Visibility (discover all apps) + Policy-based provisioning (know what to grant) + Multi-protocol automation (SCIM + API) + Verification (confirm it works)
The Six Prerequisites for Zero-Touch
True ZTP requires six integrated components. Most companies have 1-2. All six are needed.
Prerequisite 1: Complete Visibility Into All Apps (Including Shadow IT)
What it is: Discovery and continuous monitoring of all apps employees actually use (not just SSO-connected apps)
Why needed: You can't provision what you don't know exists. Zero-touch requires knowing about 100% of apps, not just the 30-40% connected to SSO.
Without it:
You automate provisioning for 35 SSO-connected apps
Employees use 100+ apps total (including shadow IT)
65+ apps remain unmanaged:
- No provisioning
- No deprovisioning
- No access control
- Security blind spot
Result: You automated 35% of reality, left 65% unmanaged
With it:
Discovery tool identifies all 100+ apps employees use:
- SSO-connected: 35 apps
- Shadow IT: 65+ apps (Canva, Cursor AI, Grammarly, Apollo, etc.)
You now know what needs to be provisioned
You can prioritize: Which apps need zero-touch first?
You can govern: Which shadow IT apps should be sanctioned vs. blocked?
Result: Complete inventory, can provision systematically
What visibility discovers:
- OAuth connections: Apps employees connected to Google/Microsoft accounts
- SSO usage: Apps accessed via IdP (you already know these)
- Browser extensions: Tools installed in Chrome/Firefox
- SaaS spend: Apps purchased with company credit cards
- API integrations: Apps connected to Slack, GitHub, etc.
- Email patterns: SaaS vendor emails (signups, invoices, usage)
The shadow IT problem:
Marketing team:
- Uses Canva (no one told IT)
- Uses Grammarly Business (bought without IT approval)
- Uses Loom (half the team has it)
Engineering team:
- Uses Cursor AI (everyone adopted it)
- Uses Replit (for quick prototyping)
- Uses various AI coding tools (not IT-sanctioned)
Sales team:
- Uses Apollo (for prospecting)
- Uses LinkedIn Sales Navigator (personal accounts)
- Uses various sales tools (no IT involvement)
Total: 60-70% of actual apps used
IT visibility: 0%
Why this matters for zero-touch:
Scenario 1: New hire without visibility
You provision 35 SSO-connected apps automatically
Josh joins, gets access to 35 apps
Josh asks team: "What tools do you use?"
Team: "Oh, we use Canva, Cursor AI, Apollo, Grammarly..."
Josh: "Can someone add me to those?"
Team members manually add Josh (touch points)
Result: Zero-touch failed - manual touch points for 65% of apps
Scenario 2: New hire with visibility
Discovery tool shows Josh's team uses:
- 35 SSO-connected apps
- Canva (15 team members use it)
- Cursor AI (8 engineers use it)
- Apollo (all sales team uses it)
- Grammarly Business (company subscription)
System provisions all apps Josh's team actually uses
Josh arrives, has access to everything team uses
No manual requests needed
Result: True zero-touch across 100% of apps
Visibility enables:
- Complete provisioning: Provision shadow IT apps too, not just SSO apps
- Deprovisioning: Revoke access to shadow IT when employee leaves
- Governance: Decide which shadow IT to sanction vs. block
- Compliance: Audit access to all apps, not just SSO apps
- Cost control: Know what you're actually paying for (duplicate subscriptions)
Without visibility, "zero-touch provisioning" means "zero-touch for 30-40% of apps you know about."
With visibility, zero-touch means zero-touch for 100% of apps employees actually use.
Prerequisite 2: HRMS Integration (HR-Driven Provisioning)
What it is: Automatic sync between HRMS (Workday, BambooHR) and IdP (Okta, Azure AD)
Why needed: HRIS is source of truth for employee data. Zero-touch requires automatic trigger when HR enters new hire.
Without it:
HR adds new hire to Workday
HR separately emails you
You manually create Okta account
Not zero-touch (HR email = touch point)
With it:
HR adds new hire to Workday
Workday → Okta sync (automatic webhook or API poll)
Okta account created (no action from you)
Zero-touch (one action: HR only)
This is Prerequisite #2 because nothing else matters without Prerequisite #1 (visibility). You need to know what apps exist (visibility) AND when to provision them (HRMS triggers). Without HRMS integration triggering provisioning automatically, you'll always have manual touch points.
See our HR-driven provisioning guide for detailed implementation.
Prerequisite 3: Policy-Based Provisioning
What it is: Rules that determine what access someone should get based on attributes
Why needed: System must know what to provision. Can't ask you each time (that's a touch point).
Traditional approach (manual):
You: "New engineer joining. What does the Platform team need?"
Manager: "GitHub, Jira, Slack, AWS..."
You: Take notes, provision manually
Touch point (you asking manager)
Policy-based approach (automatic)
System: Detects new engineer, Platform team
System: Queries policy ("What does Platform engineer get?")
Policy returns: GitHub (repos X,Y,Z), Jira (project P), Slack (channels A,B,C)
System: Provisions automatically
No touch point
Example policies:
Birthright access (role-based):
IF role = "Software Engineer"
THEN grant:
- GitHub: Company organization (member)
- Slack: All company channels
- Google Workspace: Email, Calendar, Drive
- Zoom: Licensed account
Team-specific access:
IF team = "Platform Team"
THEN grant:
- GitHub: platform-api (write), frontend-web (write), infrastructure (read)
- Jira: Platform project (developer role)
- Slack: #platform-team, #platform-oncall
- AWS: Dev account (platform-engineers IAM group)
Policy composition (multiple policies apply):
Josh = Software Engineer + Platform Team + Engineering + San Francisco
Combined access:
= Birthright (role)
+ Team-specific (Platform)
+ Department (Engineering)
+ Location (SF)
Total: 47 specific access grants
Without policies, provisioning requires human judgment each time. Not zero-touch.
Prerequisite 4: Multi-Protocol Automation
What it is: Ability to provision via SCIM, API, and systematic manual fallback
Why needed: SCIM covers ~20-25% of known apps (due to SSO tax). APIs cover another ~40-50%. Need all protocols for maximum coverage.
SCIM-only approach:
Known apps (SSO-connected): 35 apps
SCIM coverage: 7-9 apps (20-25%)
Gap: 26-28 apps need manual provisioning OR API automation
Result: You have touch points for 75-80% of known apps (not zero-touch)
Plus: You're ignoring 60-70% shadow IT apps entirely
SCIM + API approach:
Known apps: 35 app
SCIM coverage: 7-9 apps (20-25%)
API coverage: 24-26 apps (70-75%)
Manual: 1-2 apps (no SCIM, no API)
Result: 95%+ of known apps automated
Plus: With visibility (Prerequisite #1), you can extend to shadow IT apps
Coverage distribution:
Known apps (SSO-connected): 35 apps
SCIM apps: 7-9 (20-25%) → Automated via IdP
API apps: 24-26 (70-75%) → Automated via custom integration
No API apps: 1-2 (<5%) → Manual ticket created automatically by system
Total known apps: 35 apps, 33-34/35 automated (95%+)
Your touch points: 0 (manual tickets created automatically by system)
Shadow IT apps: 65+ apps discovered via Prerequisite #1
For each shadow IT app:
- Has API? → Automate via API
-No API? → Manual ticket OR block app (governance decision)
Without multi-protocol support, you're stuck at 20-25% coverage of known apps. Not zero-touch.
Prerequisite 5: Access Verification
What it is: Automated testing that provisioned access actually works
Why needed: "Provisioned" doesn't mean "working." Need to verify before employee arrives.
Without verification:
Day 1, 9am: Josh logs in
Josh: "I can't access GitHub"
Josh messages you (touch point)
You investigate: Account created but no repo access (cache delay)
You fix manually (touch point)
Zero-touch failed (2 post-provisioning touch points)
With verification:
Day 1, 12:15am: Provisioning completes
Verification runs:
- GitHub: ✗ Can't clone repo (cache delay detected)
- System waits 5 minutes, retries
- GitHub: ✓ Access working now
Day 1, 9am: Josh logs in
Josh: GitHub access works immediately ✓
No touch points
Verification tests:
- Authentication: Can user log in to app?
- Permission check: Does user have expected role/permissions?
- Resource access: Can user access specific resources (repos, projects, channels)?
- Smoke test: Can user perform critical operations (clone repo, create issue, post message)?
Common issues verification catches:
- Cache delays: App provisioned but cache not updated (5-30 min delay)
- Permission errors: Account created but wrong permissions
- API failures: Call succeeded but didn't actually provision
- Configuration drift: System thinks access granted, app says no
Without verification, "provisioned" ≠ "working." Employees discover issues on Day 1, creating touch points.
Prerequisite 6: Exception Handling
What it is: Systematic handling of cases that can't be fully automated
Why needed: 100% automation is impossible. But 95% automation + 5% systematic exceptions = zero-touch.
Exception types:
Exception 1: App has no automation
App: Miro (no SCIM, no API)
Action: Auto-create ticket for you
Result: You handle manually, but HR didn't touch it (still zero-touch from HR perspective)
Exception 2: Policy doesn't exist
New role: "Staff Engineer" (first person in this role)
Action: Provision baseline + request manager approval for additional access
Result: Manager approves, system creates policy for next Staff Engineer
Exception 3: Access requires approval
Resource: Production database (requires security approval)
Action: Auto-create approval request
Result: Security reviews and approves, system provisions
Exception 4: Provisioning fails
API call fails: Rate limit exceeded
Action: Retry with exponential backoff, alert if still fails
Result: System handles automatically, alerts you only if all retries fail
Exception 5: Compliance requires documentation
User needs PII access (GDPR requirement)
Action: Auto-request justification, provision after acknowledgment
Result: User acknowledges, system provisions and logs for compliance
Key principle: Exceptions are handled systematically (auto-create tickets, auto-request approvals, auto-retry). Not zero-touch automation, but zero-touch from HR perspective (HR still only touched once).
Common Pitfalls: Why Zero-Touch Implementations Fail
Pitfall 1: You Don't Have Zero-Touch, You Have 20-25% SCIM Coverage of Known Apps (And Zero Visibility Into Shadow IT)
What you think: "We implemented SCIM. We have zero-touch provisioning."
What you actually have:
- SCIM provisions 7-9 out of 35 known apps (20-25%)
- You still manually provision 26-28 known apps (75-80%)
- You have zero visibility into 65+ shadow IT apps (60-70% of reality)
- Total automation: <10% of actual apps employees use
What this looks like:
- Known apps (SSO-connected): 35 apps
- 7-9 apps with SCIM: Accounts created automatically ✓
- 26-28 apps without SCIM: You provision manually ✗
- All apps: You configure granular permissions manually ✗
- Unknown apps (shadow IT): 65+ apps
- Canva, Cursor AI, Apollo, Grammarly, Replit, Loom, etc.
- Zero visibility ✗
- Zero provisioning ✗
- Zero deprovisioning ✗
Why this isn't zero-touch:
- You still spend 2-3 hours per new hire on manual work (known apps)
- New hires still experience delays (waiting for manual provisioning)
- New hires manually request shadow IT access from teammates (touch points)
- You still have 10+ touch points (HR, you, teammates for shadow IT apps)
The three gaps you're missing:
Gap 1: Low SCIM coverage due to SSO tax
Most vendors charge extra for SCIM (SSO tax)
Only 20-25% of known apps actually have SCIM
Even if app has SSO, doesn't mean it has SCIM
Gap 2: SCIM creates accounts, not granular permissions
SCIM: Creates GitHub account ✓
You: Manually grant repo access (write to platform-api, read to infrastructure) ✗
Time: 2-3 hours per hire configuring granular permissions
Gap 3: Zero visibility into 60-70% of apps (shadow IT)
You automated 7-9 out of 100 total apps (7-9%)
You're provisioning 10% and leaving 90% unmanaged
Employees manually add new hires to shadow IT apps (touch points)
At 100 hires/quarter, you're still spending 250 hours manually provisioning known apps + employees spending unknown hours adding teammates to shadow IT. That's not zero-touch, that's SCIM-only with no shadow IT visibility.
Pitfall 2: You Automated Accounts But Permissions Are Still Manual
What you think: "SCIM creates accounts automatically. We're good."
What your new hires experience:
Day 1, 9am: Josh logs in
Josh: "I can access GitHub, but I can't see any repos"
Josh: "I can access Jira, but I can't create issues"
Josh: "I can access Slack, but I'm not in any channels"
Josh messages you: "My access doesn't work"
Why this happens:
- SCIM provisions accounts (username + password)
- SCIM doesn't configure permissions (which repos, which projects, which channels)
- You still need to manually grant specific access
The math:
- SCIM coverage: 20-25% of known apps (account creation only)
- Manual permission configuration: 100% of all apps (including SCIM apps)
- Shadow IT: 60-70% of apps (zero automation)
You automated the easy part (accounts for 20-25% of known apps). You didn't automate the hard part (granular permissions for 100% of apps, plus 60-70% shadow IT).
At 50 hires/month, you spend 150+ hours manually configuring permissions. You automated a small fraction of account creation, not access.
Pitfall 3: No Policies = You're Still Making Manual Decisions
What you think: "We automated account creation. IT configures access based on request."
What actually happens: Every "based on request" is a touch point. Not zero-touch.
Your process:
New hire: Josh Martinez, Software Engineer, Platform Team
System: Creates accounts in 22 apps
System: "What specific access should Josh get?"
You: Check with Platform team lead (touch point)
Team lead: "Give Josh write access to platform-api, read to infrastructure"
You: Configure manually (touch point)
Touch points: 3 (HR, you, team lead). Not zero-touch.
Why policies eliminate touch points:
System: Detects Software Engineer + Platform Team
System: Queries policy engine
Policy: "Platform Engineers get write to platform-api, write to frontend-web, read to infrastructure"
System: Provisions automatically
Touch points: 1 (HR only)
Without policies, someone (you) has to decide what to provision. That decision is a touch point.
If you're still asking "What access does this person need?" for each new hire, you don't have zero-touch.
Pitfall 4: You Hope Access Works Instead of Verifying
What you think: "Provisioning completed successfully. Josh is ready."
What actually happens:
Sunday midnight: System provisions Josh
Sunday 12:15am: System logs: "Provisioning completed ✓"
Monday 9am: Josh logs in
Josh: "GitHub says 'access denied'"
Josh messages you (touch point)
You investigate: Cache delay, access not replicated yet
You wait 30 min, access works
Josh lost 30 minutes of Day 1 productivity
Common provisioning issues that verification catches:
- Cache delays: App provisioned but cache not updated (5-30 min delay)
- Permission errors: Account created but wrong permissions
- API failures: Call succeeded but didn't actually provision
- Configuration drift: System thinks access granted, app says no
With verification:
Sunday 12:15am: System provisions Josh
Sunday 12:16am: Verification tests GitHub access
Sunday 12:16am: GitHub ✗ Access denied (cache delay)
Sunday 12:20am: System retries
Sunday 12:20am: GitHub ✓ Access works
Monday 9am: Josh logs in, everything works immediately
No touch points
"Trust but verify." Without verification, you're just trusting and hoping nothing went wrong.
If you don't test that provisioned access actually works, your first verification test is the new hire on Day 1. That's not zero-touch.
Pitfall 5: You're Waiting for 100% Automation (Ship 95%)
What you think: "We need 100% automation before we call it zero-touch."
What's actually happening:
- 34 out of 35 apps automated
- 1 app (legacy system, no API) requires manual work
- You delay launch: "Not ready until we automate that last app"
- Months pass, still not launched
The cost of waiting:
Current state: 0% automation, 3 days to provision, 8 hours IT work per hire
Delayed state: 95% automation ready, still doing 0% because waiting for 100%
Result: Continuing to waste time/money while waiting for perfection
The right approach:
Launch at 95%:
- 34 apps: Fully automated
- 1 app: Auto-create manual ticket for you
- HR still only touches once
- You handle 1 ticket (instead of 35 manual provisions)
- 97% reduction in your work
Zero-touch from HR perspective (HR touched once). Not zero-touch automation (1 app manual). Still massive win.
Don't let perfect be the enemy of really good. Launch at 95%, optimize to 97%, accept 3% systematic exceptions.
If you've been "working on zero-touch" for 6+ months and haven't launched, you're waiting for 100%. Ship 95% now.
Pitfall 6: You Think This Is Just an IT Project
What you think: "Provisioning is IT's domain. We'll handle this."
What actually happens:
- You build integration without HR input
- You discover: HRIS data incomplete (no "team" field)
- You go back to HR: "Can you populate team field?"
- HR: "We don't track teams, we track departments"
- You: "We need teams for policy-based provisioning"
- HR: "That'll take 3 months to add and populate historically"
- Project delayed 3 months
Why this fails:
- Zero-touch provisioning requires HR + IT + Security collaboration
- HR ensures HRIS data quality
- Security defines compliance requirements
- You build technical integration
The right approach:
- You + HR collaborate upfront on data requirements
- HR ensures all required fields populated in HRIS
- You build integration that reads clean, complete data
- Security defines which apps require approval, compliance requirements
- Launch smoothly: data is ready, policies are clear
Zero-touch provisioning is a cross-functional project, not an IT-only project.
If you haven't had a kickoff meeting with HR and Security, you're setting yourself up to discover blockers 3 months into development.
The Business Case for Zero-Touch
Why zero-touch isn't just efficiency—it's strategic priority.
1. Time to Productivity
Traditional provisioning:
- New hire starts Monday
- Day 1: Some access works, employee at 30% productivity
- Day 2: More access, employee at 60% productivity
- Day 3: Employee fully productive
First 3 days: Employee at 50% average productivity (30% + 60% + 100% ÷ 3)
Zero-touch provisioning:
- New hire starts Monday
- Day 1, 9am: Employee fully productive immediately
First 3 days: Employee at 100% productivity from Day 1
Impact:
- 50% productivity gain in first 3 days
- At $100K salary ($48/hour), that's 3 days × 8 hours × $48 × 50% lost = $576 per new hire (traditional)
- At 100 hires/quarter: $57,600 in lost productivity (traditional) vs. $0 (zero-touch)
2. IT Efficiency (Your Team's Time)
Traditional provisioning:
- 3 hours per new hire
- 100 new hires per quarter
- 300 IT hours per quarter = 7.5 weeks of full-time work
Zero-touch provisioning:
- 0 hours per new hire (automated)
- 100 new hires per quarter
- 0 IT hours per quarter
Your team's time saved: 300 hours per quarter = ~$30,000 in labor costs (at $100/hour loaded cost)
More importantly: Your team can focus on strategic projects, security improvements, infrastructure—not manual provisioning.
At 100 hires/month, you need 2 FTEs just for provisioning. Zero-touch frees up 2 FTEs for higher-value work.
3. Employee Experience (First Impression)
Traditional provisioning:
- New hire: "Why doesn't my access work?"
- New hire: "Can someone add me to GitHub?"
- New hire: "I still can't access Jira"
- New hire's impression: "This company is disorganized"
- New hire tells recruiter: "Onboarding was painful"
Zero-touch provisioning:
- New hire: Logs in, everything works immediately
- New hire: Impressed by operational maturity
- New hire's impression: "This company has its act together"
- New hire tells recruiter: "Best onboarding experience I've had"
First impression matters. New hire experience sets the tone for entire employment.
In competitive talent market, candidates compare onboarding experiences. Your Day 1 experience is part of your recruiting pitch.
4. Scalability (Growth Without IT Headcount Growth)
Traditional provisioning scales linearly:
- 10 new hires/month: 30 hours (manageable)
- 50 new hires/month: 150 hours = 1 FTE
- 100 new hires/month: 300 hours = 2 FTEs
Linear scaling problem: Double the hires = double the IT headcount
Zero-touch provisioning scales infinitely:
- 10 new hires/month: 0 hours
- 50 new hires/month: 0 hours
- 100 new hires/month: 0 hours
Infinite scaling: 10x the hires = same IT headcount
Strategic insight: Growth doesn't require IT team growth. You can scale a company without scaling IT headcount for provisioning.
This is a strategic enabler for growth, not just an efficiency play.
5. Error Reduction (Quality + Less Firefighting)
Traditional provisioning:
- 15-20% error rate (wrong access granted, forgotten apps, typos)
- 100 new hires × 15% error rate = 15 employees with access issues
- Each error: 1-2 hours to troubleshoot and fix
- Total: 15-30 hours wasted fixing errors
- Plus: New hire frustration, your frustration
Zero-touch provisioning:
- <2% error rate (automated, consistent, verified)
- 100 new hires × 2% error rate = 2 employees with access issues
- Each error: Caught by verification, fixed before Day 1
- Total: 2-4 hours, issues fixed proactively
- New hires don't experience issues
Quality improvement: 85% reduction in errors
Fewer Day 1 firefighting: You're not troubleshooting access issues every Monday morning.
6. Security & Compliance (Audit-Ready)
Traditional provisioning:
- Audit question: "When was employee X terminated and when was access revoked?"
- You: "Let me check emails... HR told us on Day 2... we deprovisioned on Day 4..."
- Auditor: "So former employee had access for 4 days?"
- Audit finding: Failed (access not revoked within 24 hours)
Zero-touch provisioning:
- Audit question: "When was employee X terminated and when was access revoked?"
- System: "Terminated in HRIS: 2024-03-15 17:00. Access revoked: 2024-03-15 17:12"
- Auditor: "12 minutes. Acceptable."
- Audit: Passed ✓
Complete audit trail from authoritative source (HRIS) to provisioning action to verification.
SOC 2 Type II compliance requires demonstrable timely deprovisioning. Zero-touch gives you audit-ready compliance.
Why Zero-Touch Is Strategic Priority, Not Just Efficiency
Efficiency play: "We'll save 300 IT hours per quarter"
Strategic priority:
- Growth enabler: Scale hiring without scaling IT headcount
- Competitive advantage: Better employee experience than competitors
- Compliance requirement: SOC 2 Type II requires audit trail
- Talent retention: First impression sets tone for entire employment
- Security posture: Eliminate security gaps from manual provisioning delays
This isn't about saving a few hours. This is about enabling growth, winning talent, and passing audits.
Zero-touch provisioning is infrastructure for growth, not just an efficiency improvement.
Key Takeaways
1. Zero-touch = one human action (HR enters data in HRIS)
- Everything downstream automated
- You're not involved at all
- No follow-up tickets
- Complete in 15 minutes
2. Six prerequisites required (not optional)
- Complete visibility (discover all apps including 60-70% shadow IT)
- HRMS integration (automatic trigger from HRIS)
- Policy-based provisioning (system knows what to provision)
- Multi-protocol automation (SCIM + API, maximum coverage)
- Verification (confirm access actually works)
- Exception handling (systematize edge cases)
3. "Automated provisioning" ≠ zero-touch
- Most companies: SCIM-only (20-25% of known apps, accounts but not permissions)
- Zero visibility into 60-70% shadow IT apps
- Total automation: <10% of reality
- You still manually configure access
- You still have touch points
- 1-3 days to full productivity
4. Zero-touch = 99.6% time reduction
- Traditional: 3 days to full productivity
- Zero-touch: 15 minutes to full productivity
- From "waiting for IT" to "productive Day 1, Hour 1"
5. Zero-touch scales infinitely
- Traditional: 100 new hires = 300 your hours = 2 FTEs
- Zero-touch: 100 new hires = 0 your hours
- Cost reduction: $30,000+ per quarter (at 100 hires/quarter)
6. Don't wait for 100% automation
- Launch at 95% (systematic exceptions for 5%)
- HR only touches once (still zero-touch from HR perspective)
- Massive improvement over current state
- Ship now, optimize later
7. Zero-touch requires visibility first, then HR-driven provisioning
- Can't provision what you don't know exists (60-70% shadow IT)
- Need complete app discovery before automation (Prerequisite #1)
- Can't have zero-touch if you're manually discovering employee lifecycle events
- HRIS must be authoritative source triggering provisioning (Prerequisite #2)
- See our HR-driven provisioning guide for Prerequisite #2
8. This is strategic priority, not just efficiency
- Growth enabler (scale without IT headcount growth)
- Competitive advantage (better employee experience)
- Compliance requirement (SOC 2 audit trail)
- Security posture (eliminate manual delays)
300 Hours a Quarter on Manual Provisioning. That Ends Here.
True zero-touch provisioning means HR enters new hire data in HRIS and everything else—account creation, access configuration, verification, notifications—happens automatically. You're not involved at all. No manual steps. 15 minutes from HR entry to productive employee.
Most companies claiming "automated provisioning" have SCIM-only (accounts created for 20-25% of known apps, you still configure permissions manually, zero visibility into 60-70% shadow IT). This is ~10% automation of reality, not zero-touch. True zero-touch requires all six prerequisites: complete visibility into all apps (including shadow IT), HRMS integration, policy-based provisioning, multi-protocol automation, automated verification, and systematic exception handling.
The business case is clear:
- 99.6% reduction in time-to-productivity (3 days → 15 minutes)
- $30,000+ in your team's labor savings per quarter (at 100 hires/quarter)
- Better employee experience (first impression matters)
- Infinite scalability (growth without IT headcount growth)
- Audit-ready compliance (complete audit trail from HRIS)
- 85% reduction in provisioning errors
But this isn't just about efficiency. Zero-touch is strategic priority:
- Growth enabler: You can scale hiring 10x without scaling IT headcount
- Competitive advantage: Candidates compare Day 1 experience
- Compliance requirement: SOC 2 Type II requires audit trail
- Security posture: No more delays between termination and deprovisioning
The question isn't "Should we implement zero-touch provisioning?"
The question is "Can we afford not to?"
At 100 hires/quarter, you're currently spending 300 hours (7.5 weeks) of your team's time on manual provisioning. Zero-touch frees up that time for strategic work. Your competitors are already doing this.
Frequently Asked Questions
Q: What is zero-touch provisioning?
Zero-touch provisioning means exactly one human action triggers complete employee provisioning: HR enters employee data in HRIS. Everything else — account creation, access configuration, verification, notification — happens automatically. You're not involved. No manual steps. Employee productive on Day 1, Hour 1.
The defining test: count human actions required for new hire provisioning. If the answer is anything other than 1 (HR only), you don't have zero-touch.
Q: How is zero-touch provisioning different from "automated provisioning"?
Most companies claiming "automated provisioning" have implemented SCIM, which automates account creation for 20-25% of known apps. That still leaves:
- 75-80% of known apps provisioned manually
- 100% of apps requiring manual permission configuration (SCIM creates accounts, not granular access)
- 60-70% of actual apps (shadow IT) completely invisible and unmanaged
Automated provisioning typically means 5 human touch points and <10% of actual apps automated. Zero-touch means 1 human touch point (HR only) and 95%+ of apps automated — including shadow IT.
Q: What's the "one-touch test" and how do we run it?
Count every human action in your current new hire provisioning process. Each of these counts as a touch point:
- HR sends you an email or Slack message
- You create an IdP account
- You provision any app manually
- You configure permissions in any app
- You verify access works
- Manager grants team-specific access
- New hire requests missing apps
If your count is more than 1 (HR adding to HRIS), you don't have zero-touch. Most IT teams discover they have 8-12 touch points when they run this test honestly. The audit is uncomfortable — and useful.
Q: Does zero-touch mean 100% automation? What about apps that can't be automated?
No. Zero-touch means zero-touch from HR's perspective — HR acts once, everything else is handled. A 95% automated system with systematic exception handling for the remaining 5% qualifies as zero-touch.
For apps with no SCIM and no API, the right approach is auto-creating a ticket for you with the required access details pre-populated. HR still only touches once. You handle 1-2 tickets instead of provisioning 35 apps manually. That's a 97% reduction in your work, and it's still zero-touch by the only definition that matters.
Q: We have Okta with SCIM set up. Don't we already have zero-touch?
Not quite. SCIM + Okta gives you account creation automation for the apps that support SCIM — typically 20-25% of your known apps, because most vendors bundle SCIM in enterprise tiers (the "SSO tax"). More importantly, SCIM creates accounts but doesn't configure granular permissions. Your new hire has a GitHub account but can't see any repos. A Jira account but can't create issues. A Salesforce account but isn't assigned to any role.
You still spend 2-3 hours per hire manually configuring permissions in every app — including the SCIM ones. That's not zero-touch.
Q: What's the SSO tax and why does it matter for zero-touch?
The SSO tax refers to SaaS vendors bundling SSO and SCIM support in their enterprise pricing tiers — often 2-4x the base plan cost. The result is that many companies can't economically enable SCIM across their full app stack. An app having SSO doesn't mean it has SCIM. GitHub has SCIM. Linear has SSO, no SCIM. Notion has SSO, no SCIM. Figma charges extra for SCIM.
This is why SCIM-only coverage is 20-25% of known apps in practice, not 60-70% as commonly assumed. API-based automation bypasses this limitation entirely — no SSO tax, no enterprise plan required.
Q: What does API-based automation do that SCIM can't?
Three things SCIM fundamentally can't do:
First, granular permission configuration. SCIM creates accounts. API calls configure actual access — which GitHub repos with which permissions, which Jira projects with which role, which Slack channels, which Salesforce role. This is the difference between "Josh has a GitHub account" and "Josh can actually work."
Second, coverage for apps without SCIM. Most modern SaaS apps have APIs even without SCIM. API-based automation reaches 70-75% of known apps — combined with SCIM's 20-25%, you get 95%+ total coverage.
Third, shadow IT visibility. SCIM only sees apps connected to your IdP. API-based automation, combined with discovery tools, can extend to the 60-70% of apps employees actually use that aren't SSO-connected.
Q: What are the prerequisites for zero-touch provisioning?
- Complete visibility — discover all apps employees actually use, including 60-70% shadow IT outside your IdP
- HRMS integration — automatic sync from HRIS (Workday, BambooHR, ADP) to IdP so HR's single action triggers provisioning
- Policy-based provisioning — rules that determine what access each role/team/department gets, so the system decides without asking you
- Multi-protocol automation — SCIM where available, API for everything else, systematic exception handling for the remainder
- Access verification — automated testing that provisioned access actually works before Day 1 (catches cache delays, permission errors, API failures)
- Exception handling — systematic routing of edge cases (apps with no API, elevated access requiring approval, compliance-gated resources) without manual intervention
Missing any one of these means you have partial automation with remaining touch points, not zero-touch.
Q: Why is visibility listed as Prerequisite 1 — before HRMS integration?
Because you can't provision what you don't know exists. If you automate provisioning for 35 SSO-connected apps without visibility, your new hire arrives with access to 35 apps and then spends their first week asking teammates to add them to Canva, Cursor AI, Apollo, and 60+ other tools the team actually uses. That's manual touch points for the majority of apps — zero-touch failed.
Visibility first means discovering the complete app inventory (including shadow IT) before building provisioning automation. Then you're automating 100% of reality, not 30-40%.
Q: How do policies work in zero-touch provisioning? Who defines them?
Policies are rules that map employee attributes to specific access grants. For example: IF role = "Software Engineer" AND team = "Platform" THEN grant GitHub (platform-api: write, infrastructure: read), Jira (Platform project: developer role), Slack (#platform-team, #platform-oncall).
Policies are defined collaboratively: you build the technical implementation, managers define what their teams need, security defines what requires approval, HR ensures the attribute fields (role, team, department) are clean in HRIS. This is why zero-touch is a cross-functional project, not an IT project — policies require input from people who know what access each role actually needs.
Once defined, policies mean the system provisions without asking anyone. No touch point.
Q: What does "access verification" actually check? Why is it a separate prerequisite?
Most provisioning systems confirm that an API call succeeded. Verification confirms that access actually works — these aren't the same thing.
Verification runs active tests: Can the user authenticate? Do they have the expected role and permissions? Can they access specific resources (clone a repo, create a Jira issue, post in a Slack channel)? Did caching cause a delay between provisioning and access being live?
Without verification, your first signal that provisioning failed is Josh messaging you on Day 1 at 9am. With verification, the system catches the failure at 12:15am, retries automatically, and Josh arrives to access that works. That's the difference between 0 touch points and 2 post-provisioning touch points.
Q: How does zero-touch handle shadow IT apps that aren't in our IdP?
Shadow IT is the biggest gap in most zero-touch implementations — and the most commonly ignored. The approach has three steps:
First, discover. Visibility tools identify apps through OAuth connections, browser extensions, SaaS spend data, API integrations, and email patterns. This typically reveals 60-70% more apps than your IdP shows.
Second, classify. For each discovered app: sanction it (it's legitimate, add to provisioning stack), restrict it (employees shouldn't use it, block), or monitor it (legitimate but not company-managed).
Third, automate. For sanctioned shadow IT apps: if the app has an API, build an integration and include it in provisioning policies. If no API, create a systematic process (auto-ticket, or require employees to self-serve).
Without visibility into shadow IT, "zero-touch provisioning" means zero-touch for the minority of apps you know about and manual touch points for the majority you don't.
Q: Our employees use 100+ apps. How do we know which ones to include in zero-touch provisioning?
Start with the ones that cause the most friction — the apps new hires request in their first week. Track incoming access requests for 30 days. The apps that come up repeatedly (GitHub, Slack, Jira, Salesforce, AWS, Figma) are your first provisioning candidates.
Then apply the policy test: does this app have a consistent access pattern by role or team? If yes, it belongs in automated provisioning. If access varies wildly per person, it may be better handled as a self-serve request with approval. The goal isn't automating every app — it's automating the apps with predictable, role-based access patterns, which is typically 70-80% of your stack.
Q: How long does zero-touch provisioning take to implement?
Basic implementation (new hire provisioning for top 10-15 apps) typically takes 4-8 weeks. Full implementation including role changes, contractor expiration, exception handling, and shadow IT takes 3-6 months.
The longer timeline isn't usually the technical work — HRIS integration and API connections move fast. It's the policy definition (what does each role actually need?), the data quality work (HRIS missing team fields, inconsistent job titles), and the cross-functional alignment between IT, HR, and Security. Starting those conversations early is the single biggest accelerator.
Q: Should we wait until we can automate 100% of apps before launching?
No. Waiting for 100% is the most common reason zero-touch implementations stall for 6+ months while companies continue spending hundreds of IT hours per quarter on manual provisioning.
Launch at 95%: automate the apps that support automation, create systematic exception processes for the 5% that don't. HR still touches once. You handle 1-2 exception tickets instead of provisioning 35 apps manually. That's a 97% reduction in your work from Day 1 of launch. Ship now, optimize toward 97-98% over the following quarters.
Q: We have multiple IdPs (Okta for US, Azure AD for EU). How does zero-touch work across environments?
Multi-IdP environments require a provisioning orchestration layer that sits above the individual IdPs and routes provisioning events to the correct environment based on employee attributes (typically location or entity). The HRIS event triggers the orchestration layer, which then executes against the right IdP and app stack for that employee's region.
The policy engine should be unified — consistent access policies globally — even if the execution environment differs. This avoids the compliance and audit nightmare of different access standards by region.
Q: Is zero-touch only for new hires or does it cover the full employee lifecycle?
Full lifecycle. The same framework that provisions a new hire handles:
- Role changes: Detect job title change in HRIS → apply new role policy (add new access) → remove old role-specific access (subtractive, not just additive)
- Team transfers: Detect team change → add new team access → remove old team access
- Contractor expiration: Auto-revoke on contract end date (no one needs to remember)
- Extended leave: Suspend access for duration, restore on return
- Termination: Deprovision within 15 minutes, full audit trail
- Rehire: Provision based on new role (not restore old access)
Most teams start with new hire and termination, then expand to role changes and contractors in the following quarters.
Q: How do we calculate the ROI of zero-touch provisioning?
Three direct costs to quantify:
IT labor: Hours per hire × hires per quarter × loaded hourly cost. At 3 hours per hire, 100 hires per quarter, $100/hour loaded cost = $30,000 per quarter in IT labor. Zero-touch eliminates this.
Lost productivity: Days to full productivity × daily salary × number of hires. At 3 days at 50% productivity, $100K salary, 100 hires per quarter = $57,600 per quarter in lost employee productivity. Zero-touch reduces this to near zero.
Error remediation: Error rate × hires × hours per fix × loaded hourly cost. At 15% error rate, 100 hires, 1.5 hours per fix, $100/hour = $2,250 per quarter. Zero-touch reduces errors by 85%.
Total recoverable cost at 100 hires/quarter: ~$90,000 per quarter. The ROI case typically pays for implementation within 1-2 quarters.
Q: What's the compliance argument for zero-touch when speaking to security leadership?
Three specific compliance improvements:
First, deprovisioning SLA. SOC 2 Type II requires demonstrable timely deprovisioning. Zero-touch gets this to 15 minutes from HRIS update, with a complete timestamped audit trail. Manual provisioning can't reliably demonstrate sub-24-hour deprovisioning.
Second, access creep elimination. Role changes trigger automatic subtractive enforcement — removing old access, not just adding new. Manual processes are additive-only (you remember to add, forget to remove), accumulating access over time.
Third, shadow IT coverage. Deprovisioning an employee from 35 SSO-connected apps while leaving them active in 65 shadow IT apps isn't compliant deprovisioning. Zero-touch with visibility covers the full app stack, not just what your IdP knows about.


.svg)