Lifecycle Management
• 6 min read
Reasons Why You Need a Lifecycle Management Platform
9th June, 2023
SHARE ON:
Managing different phases of the user's lifecycle can be daunting for IT teams. As they have to ensure they provide employees with the right access at the time and revoke access upon offboarding to prevent security breaches.
However, manually managing these processes can be more time-consuming and prone to errors. Fortunately, the solution to this challenge is readily available in the form of a user lifecycle management (ULM) platform.
Do you, as a CIO, feel that your IT team is struggling to manage the user lifecycle phases efficiently? If yes, would you want to give your team a platform to streamline their IT tasks?
Well, a user lifecycle management (ULM) platform could be the perfect solution for your IT team needs. By leveraging the capabilities of such a platform, your IT team can streamline user lifecycle management. It reduces the burden and saves your team's time by automating provisioning and deprovisioning.
It also improves employee experience by eliminating the waiting period to access required apps, which helps increase their productivity and efficiency.
In this blog, we have listed all the reasons explaining why you should consider implementing the ULM platform in your organization.
3 Reasons Why Adopting a Lifecycle Management Platform Can Be A Game Changer for Organizations
Below, we'll explain in detail how adopting a ULM platform will help your IT team streamline all the user lifecycle phases, i.e., onboarding, mid-lifecycle changes, and offboarding.
1. Enables your IT team to streamline provisioning
Every now and then, you see new employees being hired in a bunch, and ultimately the IT team has to manage each of the employees' accounts, granting them the right app access and so on. In such a scenario, traditional methods (using tickets-based legacy systems) won't be efficient; it can be apt to handle a few employees but not many. It will consume more time, involve human errors, and drain your IT team's effort.
So the optimal choice you can make is to opt for an automated ULM platform such as Zluri. What is Zluri? What is so unique about it?
Zluri is an intelligent ULM platform that automates granting, modifying, and revoking access. It helps your IT team ensure the right access is granted to the right SaaS app to authorized employees at the right time. How does one solution make it all possible? Through automated workflows.
Zluri lets your IT team create onboarding workflows that automate provisioning with just a few clicks, saving a lot of time and effort. Further, it ensures your new employees gain access to all the required SaaS apps to start with their work effectively from day 1.
But how to create an onboarding workflow in Zluri? Here're the steps your IT team needs to follow:
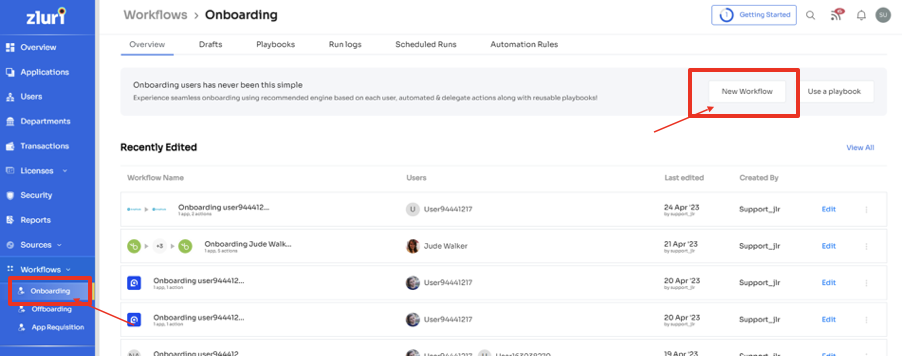
Step 1: From Zluri's main interface, click on the workflow module and select the onboarding option from the drop-down menu. Proceed by clicking on New Workflow.
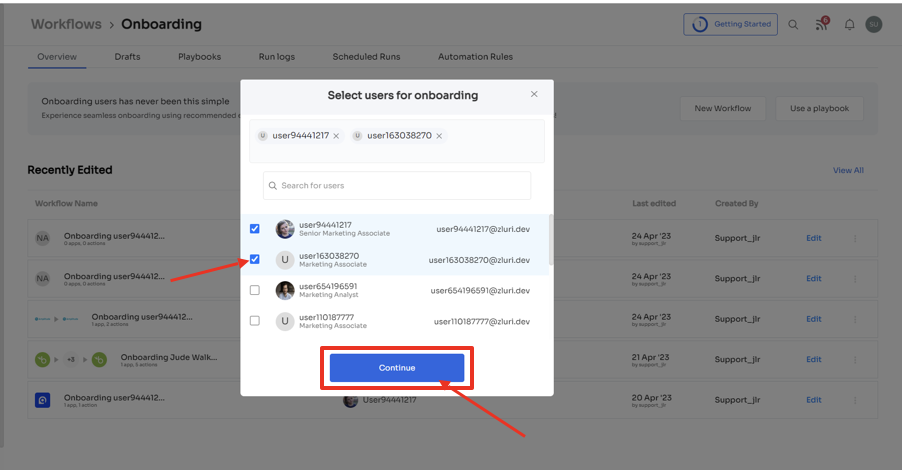
Step 2: It will open up the ‘select users for onboarding’ box; from there, select the employee(s) to onboard. Once you have selected the employees to onboard, click on continue.
Note: Zluri also gives the option to search for a particular employee in the search bar if required. It also lets you onboard multiple employees in one go.
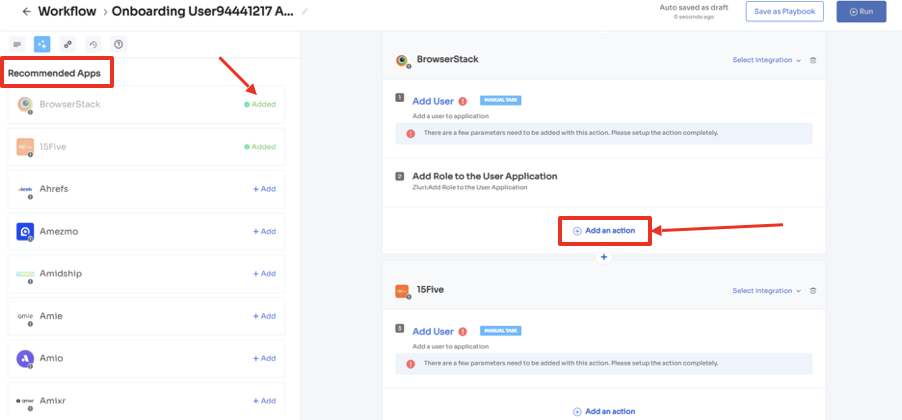
Step 3: With its intelligent feature, Zluri suggests some apps under recommended apps based on the employee's department, role, and seniority. Choose any of those, then execute the required action for the selected applications.
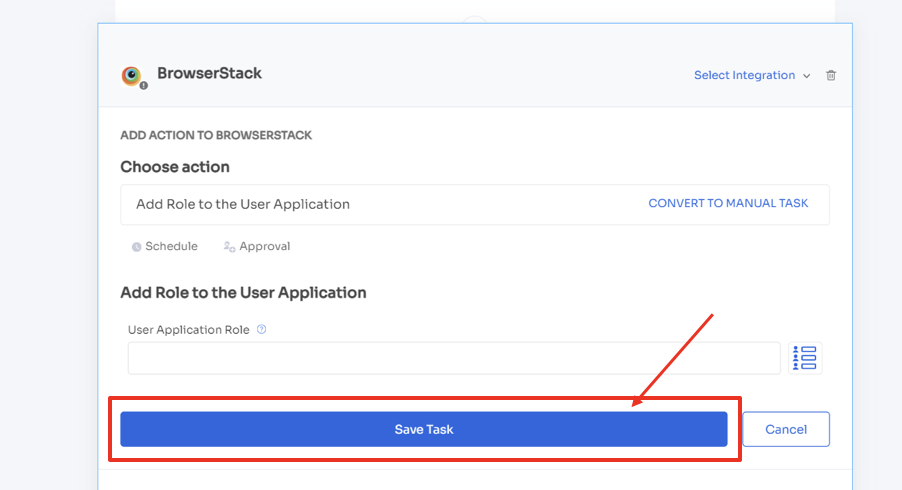
Step 4: To execute certain actions, you need to Click on Edit Task and enter the required details. Your team can schedule the actions to execute the workflow on the day of onboarding. To save the actions, click on Save Task, and the actions will be saved automatically.
Also, your team can add your employees to channels or send an automated welcome greeting using Zluri's in-app suggestions. The actions can vary for different applications and are mentioned under recommended actions.
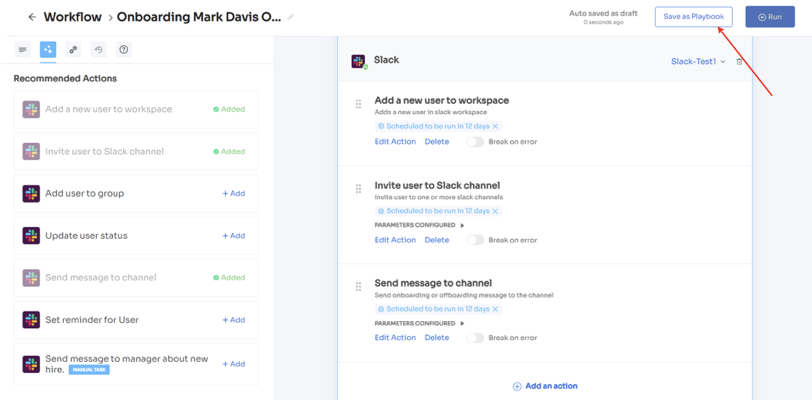
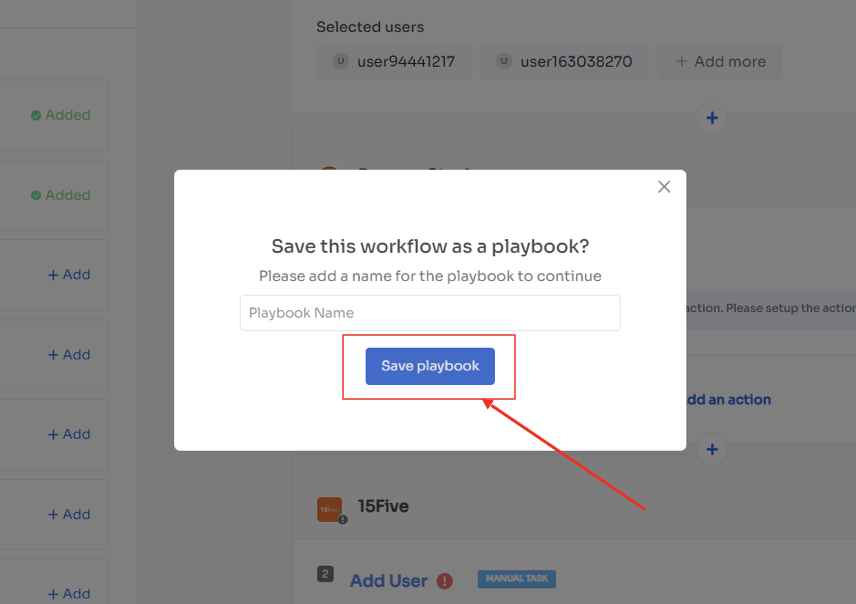
Step 5: Finally, click on Save as Playbook to save the workflow. Then, you'll get a dialogue box with instructions to name the playbook. Add a name, proceed further by clicking on Save Playbook, and the onboarding workflow is ready.
2. Enhances both IT teams & employee experience by modifying access permissions
As employees transition to new roles, departments, or locations, it's crucial for them to have access to the necessary SaaS applications to hit the ground running. However, it's equally important for your IT admin to ensure that the employees are granted only the permissions necessary for their new role while revoking their prior access to any unnecessary applications.
But how can your IT admin stay up-to-date with these changes? Zluri integrates with your organization's HRMS, allowing your IT admins to keep track of changes in employee roles effortlessly. So how does it work?
Whenever there is an update in an employee's role, your HRMS gets updated with the details, and Zluri automatically retrieves the data from the HR system and updates it on the centralized dashboard. This allows your IT admins to quickly and easily verify employee details from the dashboard and grant or remove access permissions as necessary.
This is how your IT team benefits, but Zluri doesn't stop here; it enhances employee experience by offering a self-serve model, an Employee app store, i.e., a collection of SaaS applications approved and verified by the IT admin. This gives your employees the flexibility to choose any app from the EAS and gain access to it within no time.
All your employees need to do is submit an app access request. The IT admin gets notified of the same, then verifies the employee's identity, and grants them secure access without disrupting the employee flow of work.
You might think about how your employee can raise a request in EAS. Given below are the steps that your employee has for raising an access request:
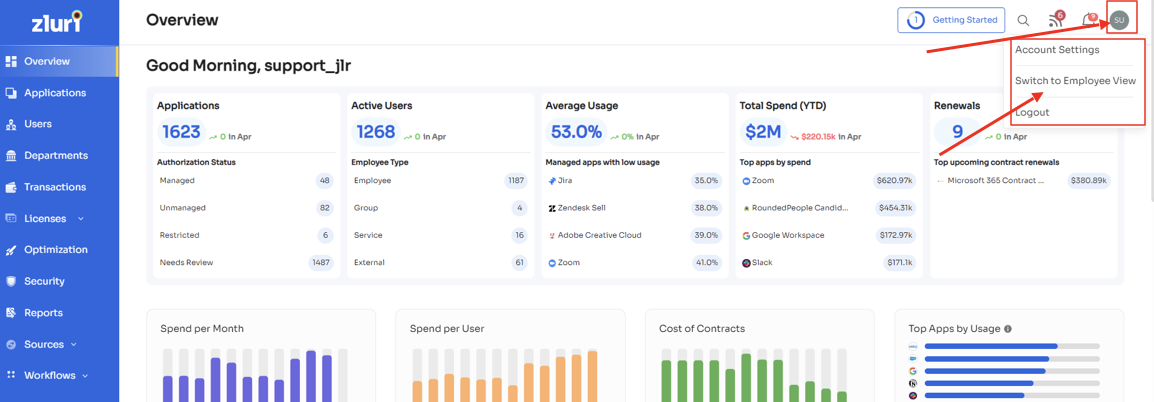
Step 1: Your employees will receive an icon on the Zluri main interface's upper right corner; click on that, and a drop-down menu will appear; from there, click Switch to Employee View.
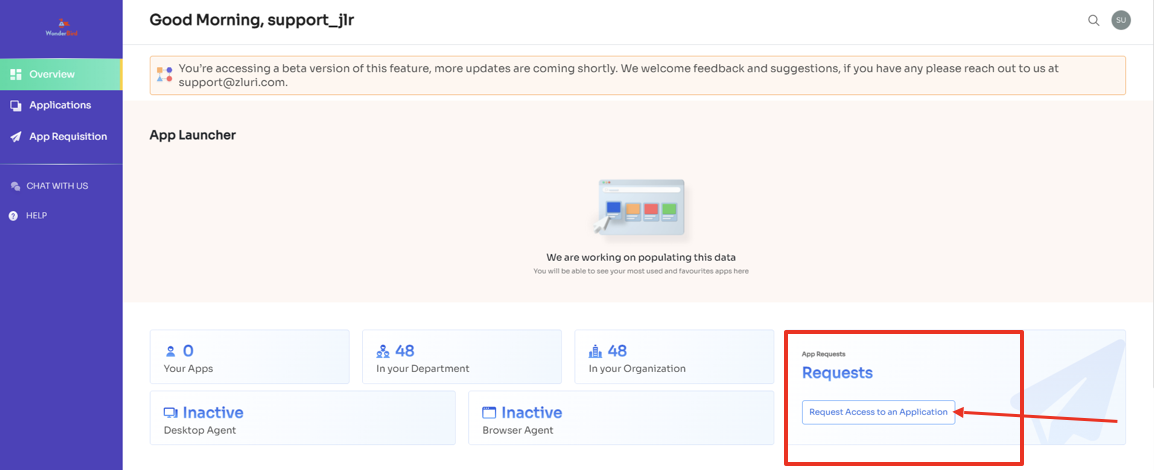
Step 2: Overview dashboard will appear by default; now click on 'Request Access to an Application
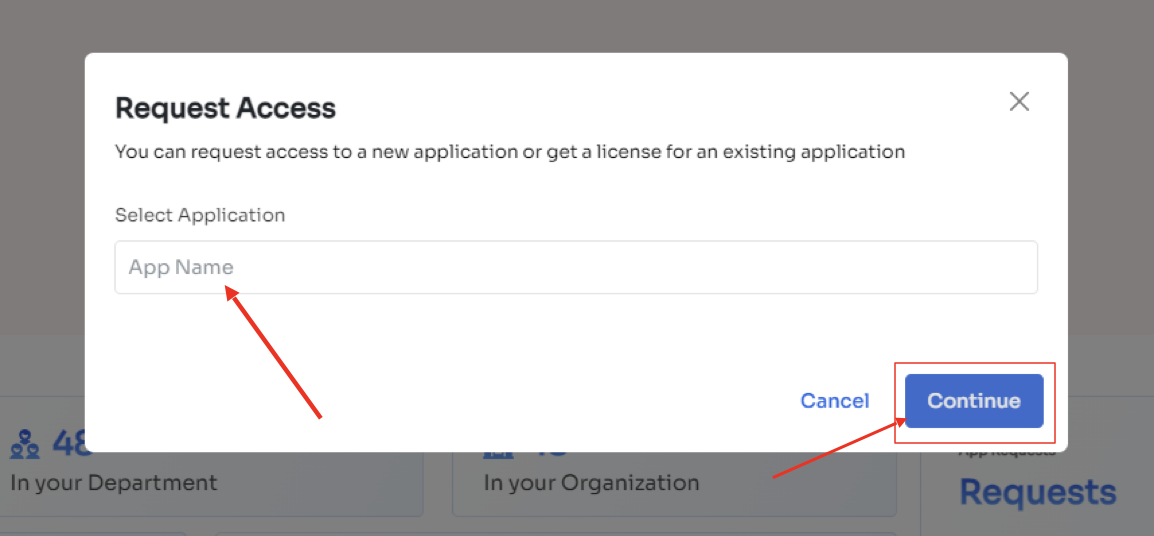
Step 3: Your employees will see a dialogue box where they need to enter the application name they require access to. Then, click on Continue.
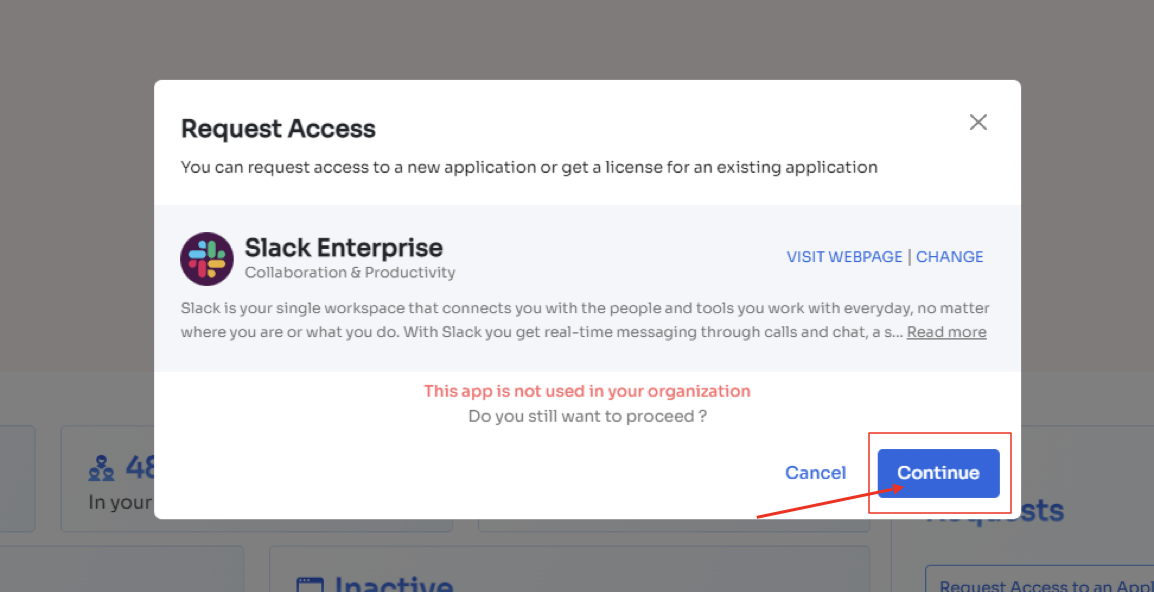
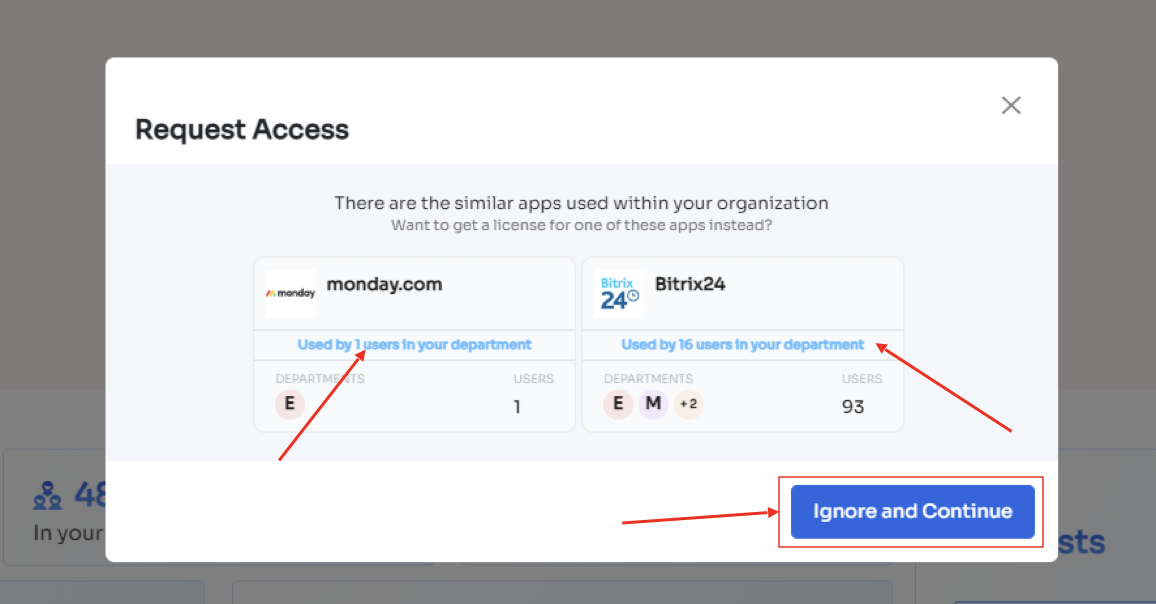
Step 4: Some applications will not be used in the organization. However, your employees can still request that application. Click on continue, and another dialogue box will appear, showing similar applications that are being used in the organization.
If your employees want to opt for a similar application, they can simply click on the application or click on Ignore and Continue to proceed forward with your request.
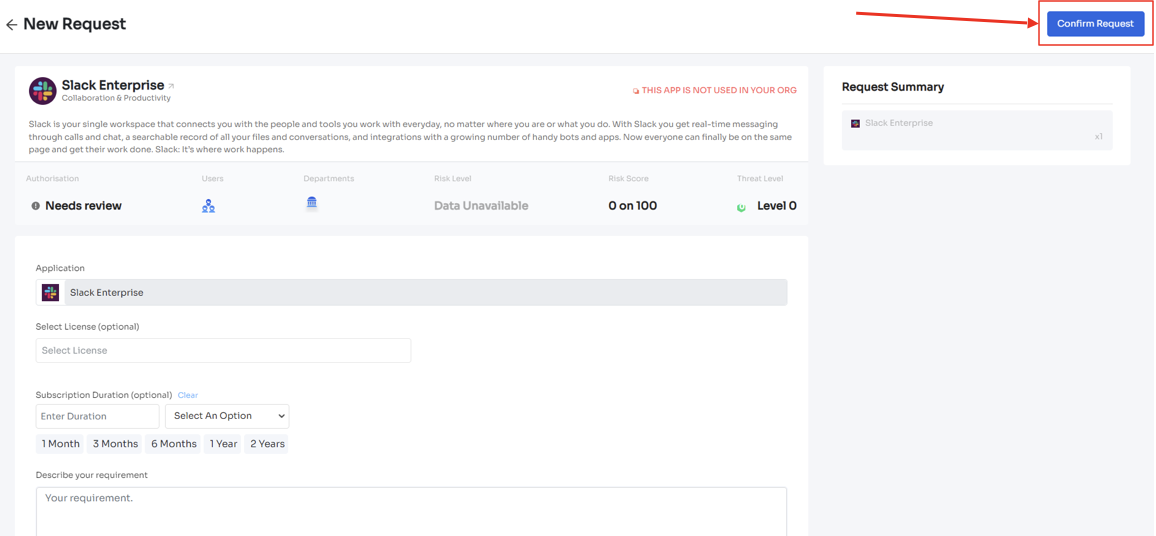
Step 5: Further, they have to fill in the required details like selecting the license plan, subscription duration, and description of why they need the application and attach supporting documents. Once filled, click on Confirm request.
Note: Additionally, if the request has been modified in any way or if one of the approvers suggests any substitutes for the application, your employee can check it in the "Changelogs."
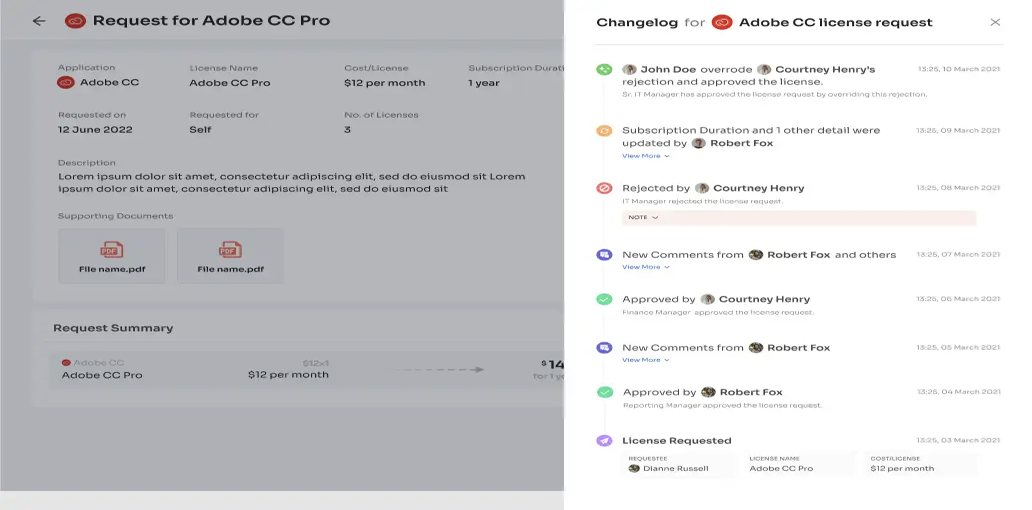
And that's it. The app access request has been submitted.
3. Helps your IT team seamlessly revoke departing employee’s access on time
Protecting your organization's sensitive data is a top priority, requiring prompt action from IT teams when employees depart from the organization. Whether it's due to termination, voluntary resignation, or sabbatical, revoking the departing employee's access to all SaaS apps and deactivating/suspending their accounts is crucial.
Delaying or failing to do so results in data breaches and leaves your organization vulnerable to unauthorized access and potential data compromise.
However, with Zluri, your team can rest assured that all access will be securely revoked without the risk of missing any critical access points. Zluri's offboarding workflow simplifies the deprovisioning process, allowing your team to efficiently and effectively manage access revocation with just a few clicks.
By simplifying this process, Zluri helps ensure that your organization's sensitive data remains secure even during employee departure.
So here are the steps that your team needs to follow to create an offboarding workflow:
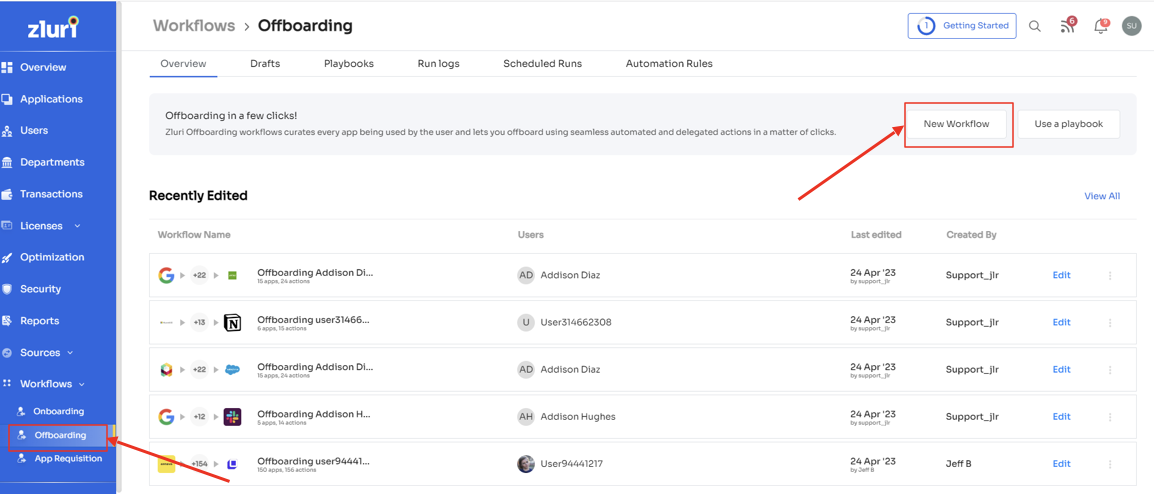
Step 1: From Zluri's main interface, click on the workflow module and select the offboarding option from the drop-down list. Proceed by clicking on New Workflow.
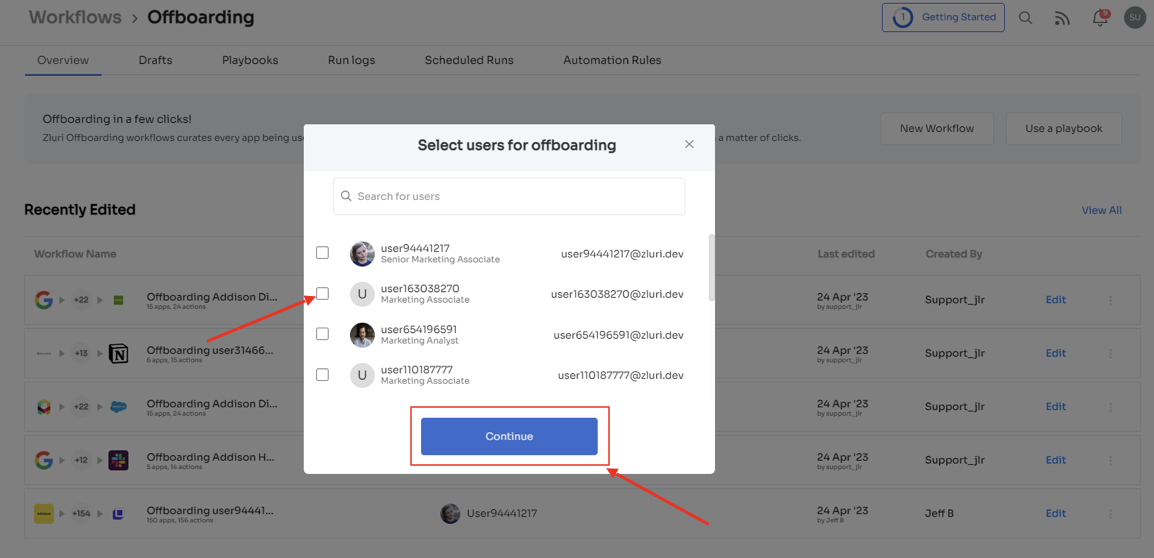
Step 2: A popup labeled 'Select the user for offboarding' will appear. Select the employee(s) you want to offboard, or you can look for them in the 'search box. Click on continue after selecting the employee.
Step 3: Your team will be able to view all the applications your employee can access. Now when you click on the app, Zluri will display some suggested actions under recommended actions. Select any of those or multiple actions, and then execute the required action for your chosen applications.
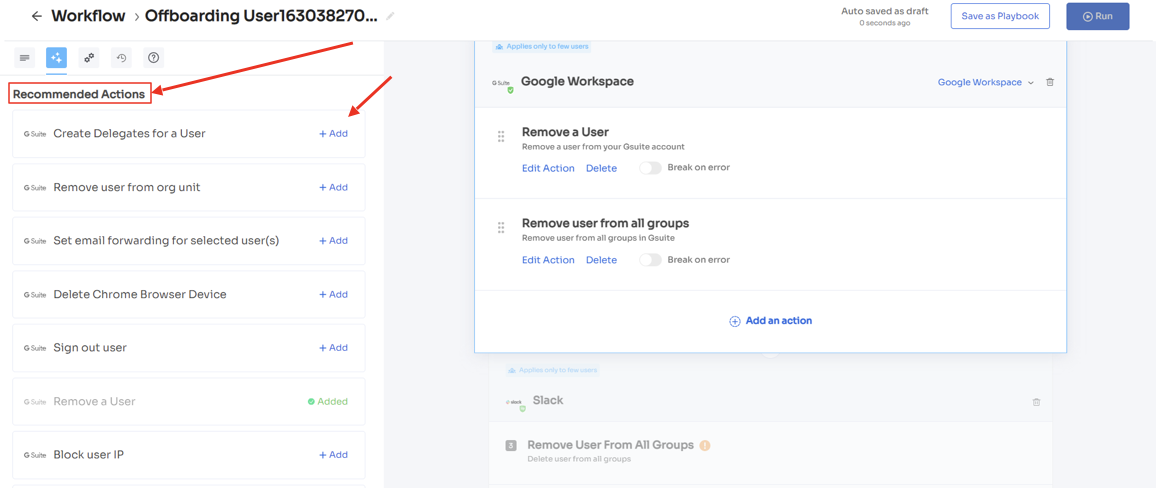
Step 4: To add other actions, click Add an Action, fill in the required details, and proceed by clicking on Save Task; the actions will be saved.

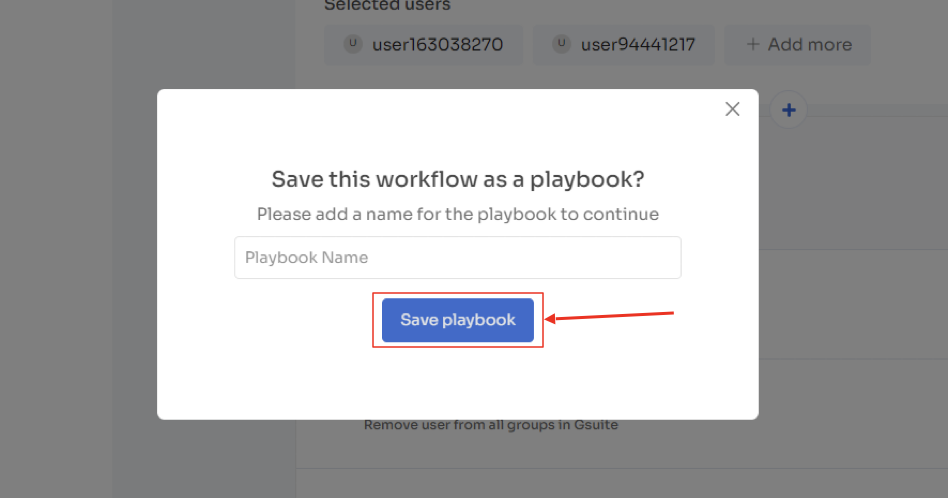
Step 5: Save the workflow by clicking Save as Playbook. A dialogue box will appear, instructing to name the playbook.
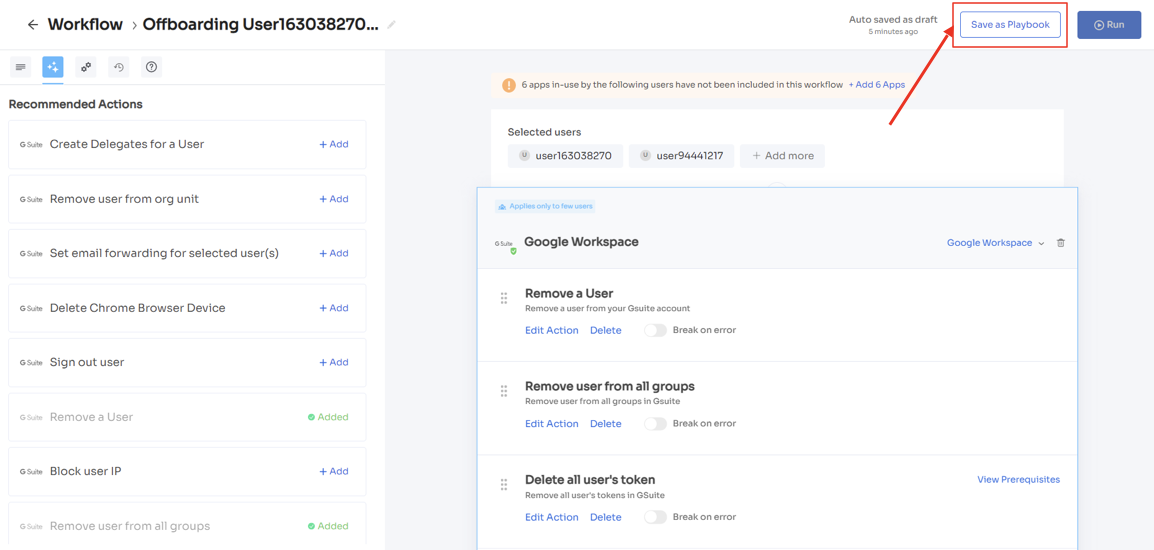
Add a name, click Save Playbook, and the offboarding workflow is ready.
So now you know why Zluri is the best of all; to learn more about it, book a demo now and give it a try.
Related Blogs
See More
Subscribe to our Newsletter
Get updates in your inbox
